
Association is one of the most useful features in Sequelize however, many find it confusing as there are comparatively very less resources available regarding Sequelize associations. Therefore in this tutorial, we will be having an in-depth look at how to implement association in Sequelize.
Before you move on further in this tutorial, please ensure you are familiar with basic sequelize usage. We already have a basic sequelize tutorial in nodejs which you can find right here.
There are three types of association/relation that can be there between two models.
- One To One (1:1)
- One To Many (1:m)
- Many To Many (m:n)
Let’s have a basic understanding of each one of the associations.
One To One relation
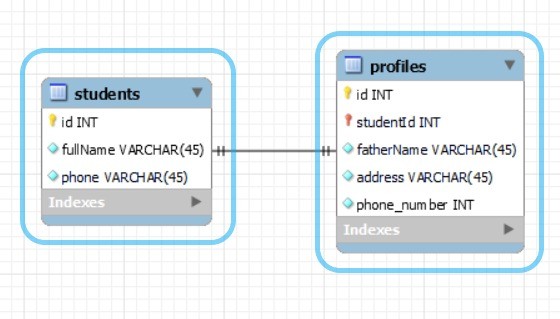
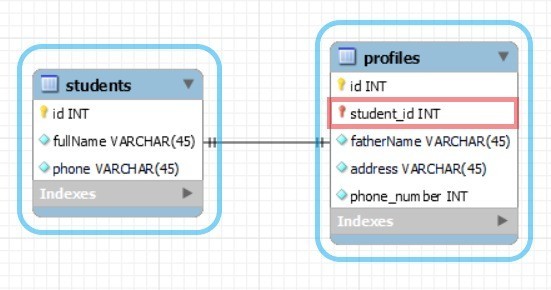
When a row of a table corresponds to a specific row of another table and vice versa, we have a One-To-One relation between the 2 tables.
For example – each “Student” in the students’ table has a corresponding “Profile” in the profiles table.
One To Many relation
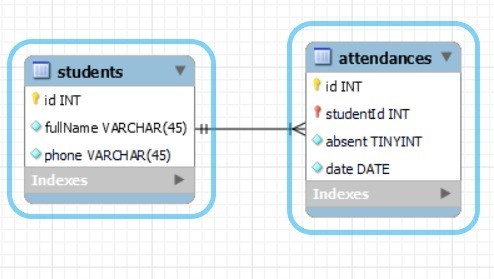
When one row of a table corresponds to multiple rows of another table it means we can have a One-To-Many relation.
For example: for each “Student” in the students’ table we will have multiple “Attendance” records(rows) in the attendance table.
Many To Many relation
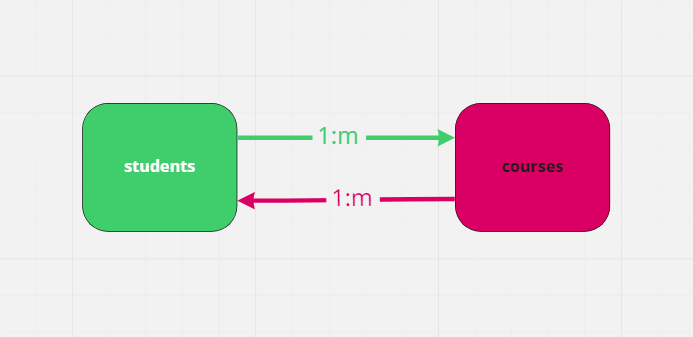
When multiple rows of a table correspond to multiple rows of another table we can have a Many-To-Many relation.
For example: – for each “Student” in the students’ table, we can have multiple rows in the courses table as a “Student” can apply for more than 1 course. Similarly for each “Course” in the courses table, we can have more than 1 “Student” attending the “Course”.

Model
A model in Sequelize looks something like this.
"use strict";
const { Model } = require("sequelize");
module.exports = (sequelize, DataTypes) => {
  class Student extends Model {
    /**
     * Helper method for defining associations.
     * This method is not a part of Sequelize lifecycle.
     * The `models/index` file will call this method automatically.
     */
    static associate(models) {
      // define association here
    }
  }
  Student.init(
    {
      fullName: DataTypes.STRING,
    },
    {
      sequelize,
      modelName: "Student",
    }
  );
  return Student;
};
Implement association in Sequelize
Methods for Sequelize associations
- hasOne – 1:1
- belongsTo – 1:1
- hasMany – 1:many
- belongsToMany – 1:many
Rules
Now you may ask “How to decide which methods to use?“. Well to make that decision easy I have formulated 2 questions that you need to ask yourself.
- Direction of query – by direction we mean, determining the start(source) and end(target) model of your query and based on this we will decide which model we need to put the association code in based on below format.
[source model] . [association method] ( [target model], options )
- Look for foreign key in source/start model – if our source model has the foreign key that we are using to perform the association, we use belongsTo/belongToMany otherwise we use hasOne/hasMany. And please remember that sequelize by default assumes the foreign key to have the following name.
foreign key name = [source model’s name] + Id
eg. if our source model is Student by default sequelize expects our foreign key on the other to be studentId
One-To-One association
hasOne
Let’s take an example of Students and their corresponding Profiles and suppose that we want to execute the below query.
Student.findAll({
  include: [
     Profile
  ]
}).then((res) => {
  // .....
});
As we have already discussed, there is a one-to-relation between our students and the profiles table and therefore we can use Sequelize’s 1:1 methods to perform the above query.
Direction of query – Student(source) → Profile(target)
Hence, based on rule 1 we know we need to put our association code in Student(source/start) model like below.
// Student model (models/Student.js)
static associate(models) {
    Student.[association method](models.Profile);
}Is foreign key in source/start model? – the foreign key we are using to perform the join is “studentId“(default).
Hence, based on rule 2 we see that the foreign key isn’t on our source/start model(Student) but our target/end model(Profile) so our association will be like below.
// Student model (models/Student.js)
static associate(models) {
    Student.hasOne(models.Profile);
}
BelongsTo
Similarly, if our query was something like the below.
Profile.findAll({
  include: [Student]
}).then((res) => {
  // .....
});
Direction of query – Profile(source) → Student(target)
Hence, based on rule 1 we know we need to put our association code in the Profile(source/start) model like below
// Student model (models/Profile.js)
static associate(models) {
    Profile.[association method](models.Student);
}
Is foreign key in the source/start model? – the foreign key we are using to perform the join is “studentId“(default).
Hence, based on rule 2 we also see that the foreign key is on our Profile(source/start) so our final association code will be below.
static associate(models) {
    Profile.belongsTo(models.Student);
}
One-To-Many association
hasMany
Let’s take an example of Students & their corresponding Attendances and suppose that we want to execute the below query.
Student.findAll({
  include: [Attendance]
}).then((res) => {
  // ......
});
As we have already discussed, there is a one-to-many relation between our students and the attendances table and therefore we can use Sequelize’s 1:m methods to perform the above query.
Direction of query – Student(source) → Attendance(target)
Hence, based on rule 1 we know we need to put our association code in Student(source/start) model like below.
// Student model (models/Student.js)
static associate(models) {
    Student.[association method](models.Attendance);
}
Is foreign key in source/start model? – the foreign key we are using to perform the join is “studentId“(default).
Based on rule 2 we see that the foreign key isn’t on our source/start model(Student) but our target/end model so our final association code will be below.
// Student model (models/Student.js)
static associate(models) {
    Student.hasMany(models.Attendance);
}
Similarly, if our query was something like below.
Attendance.findAll({
  include: [Student]
}).then((res) => {
  // .....
});
The direction of query – Attendance → Student
Based on rule 1 we know we need to put our association code in the Attendance(source/start) model like below.
// Attendance model (models/Attendance.js)
static associate(models) {
    Attendance.[association method](models.Student);
}
Is foreign key in source/ start model? – the foreign key we are using to perform the join is “studentId“.
Based on rule 2 we also see that the foreign key is on our Attendance(source/start) so our association code will be like below.
// Attendance model (models/Attendance.js)
static associate(models) {
    Attendance.belongsTo(models.Student);
}
Many-To-Many association
Basic introduction
Let’s take an example of Students & their corresponding Courses. In this scenario, a student can attend multiple courses and each course similarly can have more than one student attending it. This is very similar to our 1:m association case except that here 1:m exists for both directions.
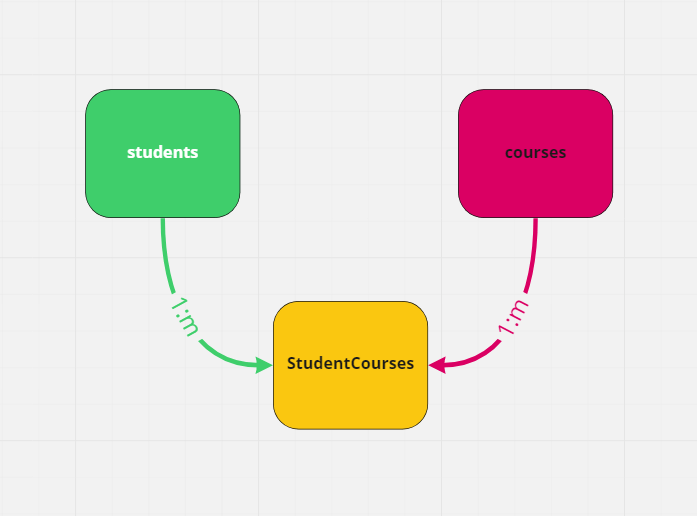
But as you may have already guessed m:n association as shown in the above diagram isn’t directly possible in the same way as 1:m was. To make m:n association work we need another table also known as the “join/through” table which will contain the foreign keys studentId(default) and courseId(default) from both the tables and is used to keep track of the association between students and courses table.
Example
Now let’s suppose we want to execute the below query.
Student.findAll({
   include: [Course]
}).then((res) => {
  // ....
});
belongsToMany
As we have already discussed, there is a one-to-many relation between our student and courses table and therefore we can use Sequelize’s n:m method to perform the above query.
Direction of query – Student(source) → Course(target)
Hence, based on rule 1 we know we need to put our association code in the Student(source/start) model like below.
// Student model (models/Student.js)
// incomplete
static associate(models) {
      Student.[association method](models.Course);
}
Is foreign key in source/ start model? – Now for m:n association we only use belongsToMany.
// Student model (models/Student.js)
// incomplete
static associate(models) {
      Student.belongToMany(models.Course);
}
You may think we are done but we are not as without a join/junction table m:n association isn’t possible in sequelize. So let’s check how we do it.
There are 2 ways we can accomplish it.
a. Provide a string in through option like below. Doing so sequelize will automatically generate a model named “StudentCourses” as a through the table with only two columns namely studentId and courseId.
// Student model (models/Student.js)
static associate(models) {
     Student.belongsToMany(models.Course, {
        through: "StudentCourses",
     });
}
b. Manually create a model named StudentCourses containing studentId and courseId fields as expected by default by sequelize and passing it in through option like below.
// Student model (models/Student.js)
static associate(models) {
      Student.[association method](models.Course, {
        through: models.StudentCourses,
      });
}
We are almost done with our m:n association and the last thing we need to do is replicate the same on the Course model side. This is because we leave it just here we won’t be able to query in the opposite direction.
// Course model (models/Course.js)
static associate(models) {
      Student.belongsToMany(models.Course, {
        through: models.StudentCourses,
      });
}
Doing the above we can now also execute the below query and with it, we are done with m:n association.
Course.findAll({
   include: [Student]
}).then((res) => {
  // ....
});
Foreign key, Source key & Target key in Sequelize associations
Default behaviour of sequelize associations
Before we move forward let’s be clear that whenever we are doing association in sequelize we are setting the join clause(on condition) of our query like below.
SELECT field1, field2, …….
FROM [source table]
INNER JOIN [target table]
ON [source table] . [source field] = [target table] . [target field]
source field = sourceKey or foreignKey depending on the direction of the query.
target field = foreignKey or targetKey depending on the direction of the query.
If you are confused don’t worry with examples it will be clear.
Examples
Consider the below association
// Student model (models/Student.js)
static associate(models) {
    Student.hasOne(models.Profile);
}
By default, sequelize will generate the below join condition.
ON students.id = profiles.studentId
Here,
source field = default sourceKey = “id“
target field = default targetKey = default foreignKey = “studentId“
Scenario 1 – set custom foreignKey in your sequelize associations
What if we don’t want the default foreignKey(studentId) but want a custom one something like student_id. We can easily do so by providing the foreignKey in options like below.
// Student model (models/Student.js)
static associate(models) {
    Student.hasOne(models.Profile, {
        foreignKey: "student_id"
    });
}
so our new join condition that would be generated is
ON students.id = profiles.student_id
Here,
source field = default sourceKey = “id“
target field = custom foreignKey = “student_id“
Scenario 2 – use a custom sourceKey in your sequelize associations
What if instead of using our default id field we want to use a different field say phone on students. We can easily do so by providing the sourceKey in options like below
Note: whenever we use any other field apart from the primary key to join 2 tables, the field must be unique.
// Student model (models/Student.js)
static associate(models) {
    Student.hasOne(models.Profile, {
        sourceKey: "phone"
    });
}
so our new join condition that would be generated is
ON students.phone = profiles.studentId
Ohh no !!!, as we can see the join condition doesn’t make sense as comparing phone with studentId won’t work. So how do we fix it?
To make it work we need to compare the phone with phone_number instead and to do that we need to provide a custom foreignKey too like below.
// Student model (models/Student.js)
static associate(models) {
    Student.hasOne(models.Profile, {
        foreignKey: "phone_number"
        sourceKey: "phone"
    });
}
so our correct join condition that would be generated is
ON students.phone = profiles.phone_number
Here,
source field = sourceKey = “phone“
target field = custom foreignKey = “phone_number“
Scenario 3 – use a custom targetKey in your sequelize associations
Now let’s suppose we want to have the association the other way around.
// Profile model (models/Profile.js)
static associate(models) {
    Profile.belongsTo(models.Student);
}
so our default join condition that would be generated is
ON profiles.studentId= students.id
Here,
source field = default foreignKey = “studentId“
target field = default targetKey = “id“
Now suppose we want to perform the above join based on students’ phone numbers. So below will our association.
// Profile model (models/Profile.js)
static associate(models) {
    Profile.belongsTo(models.Student, {
        foreignKey: "phone_number"
        targetKey: "phone"
    });
}
so our default join condition that would be generated is
ON profiles.phone_number= students.phone
Here,
source field = custom foreignKey = “phone_number“
target field = targetKey = “phone“
Although we have only discussed foreignKey, sourceKey & targetKey with regards to 1:1 association the above concepts apply to 1:m, m:n associations too.
Conclusion
That’s it for this tutorial guys. We have successfully covered almost all the various types of associations possible using sequelize. Not only that, but we also went over the concept of target/source/foreign keys in detail using examples. If you have found this post useful please do show us your appreciation by commenting, liking and sharing it with your friends.
THANK YOU!