In this tutorial, we will be creating a Vuejs plugin that will show us the current exchange rate between two currencies using OPEN-API. For those who are unfamiliar with Plugins, these are self-contained code that usually adds global-level functionality to Vue.
Before moving on further in this tutorial, let’s understand the working of our vuejs plugin.
a. User enters a currency pair eg: USD-INR
b. Our plugin internally makes an HTTP request to OPEN-API and get the exchange rate for our pair.
Create a new vuejs app
At first, we need to have Vue-CLI installed which we can do using the command.
npm install -g @vue/cliOnce we have successfully installed Vue-CLI we can create a new Vue project using the command.
vue create new-vue-pluginYou may opt for any name of your choice however for the sake of this tutorial, we have named it the new-vue-plugin.
We also have to install the Axios library to retrieve the data from OPEN-API.
npm install axiosUnderstand directory structure of our vuejs app
Once our application is created, we will create a new directory within our root directory named plugins for our plugins.
The directory structure of our application will be like this.
- public – contains our main HTML file i.e. index.html.
- src – contains all of our components and main.js file.
- plugins – contains the plugin.
Create vuejs plugin
Now that we are ready with all the required directories, we create another directory within the plugins’ directory named currency-converter which contains two files.
- Converter.vue: – structure for our vuejs plugin.
- Converter.js: – business logic for our vuejs plugin.
Converter.vue
<template>
  <div id="form">
    <input
      type="text"
      placeholder="Enter 1st Currency"
      v-model="firstCurrency"
    />
    <input
      type="text"
      placeholder="Enter 2nd Currency"
      v-model="secondCurrency"
    />
    <button @click="submit">Convert</button>
    <div id="output"><h3 v-show="converted">Rate: {{ converted }}</h3></div>
  </div>
</template>

<script>
export default {
  name: "CurrencyConverter",
};
</script>

<style scoped lang="css">
  #form {
    display: flex;
    flex-direction: column;
    gap: 12px;
    width: 300px;
    background-color: rgb(245, 247, 242);
    padding: 12px;
    border-radius: 4px;
  }

  #form input[type="text"] {
    padding: 12px;
    font-size: 16px;
    border: 0;
    border-radius: 4px;
  }

  #form button {
    padding: 12px;
    cursor: pointer;
    background-color: rgb(0, 153, 255);
    border: 0;
    font-size: 18px;
    color: white;
  }
  #output {
    min-height: 60px;
  }
</style>
Converter.js
Now that we have successfully created our component we have to create our js file for our plugin. Inside our Converter.js file, we have first imported the component. Then we have exported an object containing our install method which takes the Vue constructor as an argument and will be triggered automatically once our plugin gets registered.
import Converter from "./Converter.vue";
import axios from "axios";
export default {
  install(Vue) {
    Vue.component(Converter.name, Converter);
    Vue.mixin({
      // all your mixin codes goes here..
    });
  },
};
Vue.component()
After that, we are initializing our component using Vue.component() which takes in name as the first and the component’s .vue file as the second argument.
Vue.component(component.name, component)Vue.mixin()
After that, we have called the Vue.mixin() method to create a global mixin that will hold all the business logic of our Vue plugin and make sure it’s available across our entire app.
Vue.mixin({
      data() {
        return {
        //   Here goes all the variable used in plugin.
        };
      },
      props: {
        // The props that we want while using the element.
      },
      methods: {
        async findPrice(from, to) {
        //   Method to retrieve the converted price of a currency
        },

        async submit() {
        //   Method to output the converted price on button submit
        },
      },
});
As you can observe above, there are passed on three properties in the mixin.
data():– have all the variables that we have used in our Component.props:– holds all the props that we have passed in our element.methods:– methods to retrieve data from API and display the output.
Finally, we have the following code inside our Converter.js file
import Converter from "./Converter.vue";
import axios from "axios";
export default {
  install(Vue) {
    Vue.component(Converter.name, Converter);
    Vue.mixin({
      data() {
        return {
          firstCurrency: "",
          secondCurrency: "",
          converted: "",
        };
      },
      props: {
        rapidApiKey: {
          type: String,
          required:true,
        },
      },
      methods: {
        async findPrice(from, to) {
          if (this.rapidApiKey === undefined) {
            console.log("Please provide your rapid api key as prop");
            return;
          }
          const options = {
            method: "GET",
            url: "https://currency-exchange.p.rapidapi.com/exchange",
            params: { from, to, q: "1.0" },
            headers: {
              "x-rapidapi-host": "currency-exchange.p.rapidapi.com",
              "x-rapidapi-key": `${this.rapidApiKey}`,
            },
          };
          try {
            const { data } = await axios.request(options);
            return data;
          } catch (error) {
            console.log(error);
          }
        },

        async submit() {
          const { firstCurrency, secondCurrency, findPrice } = this;
          try {
            this.converted = await findPrice(firstCurrency, secondCurrency);
          } catch (error) {
            console.log(error);
          }
        },
      },
    });
  },
};
Use our vuejs plugin
Once we have successfully created our plugin we can simply register our plugin inside our main.js file by calling the Vue.use() method by passing our plugin as an argument.
/src/main.js
import Vue from "vue";
import App from "./App.vue";
import Converter from "../plugins/currency-exchange/Converter";

Vue.config.productionTip = false;
Vue.use(Converter); //register the plugin

new Vue({
  render: (h) => h(App),
}).$mount("#app");
Once we have registered the plugin we can use it as an element within any of our Components. Simply head over to a component like App.vue and use it as an element using the name of the plugin’s name i.e. CurrencyConverter.
App.vue
<template>
  <div id="app">
    <h1> Currency converter usage example </h1>

    <!-- Plugin used  -->
    <CurrencyConverter> </CurrencyConverter>
  </div>
</template>

<script>

export default {
  name: "App",

};
</script>

<style>
#app {
  display: flex;
  justify-content: center;
}
</style>
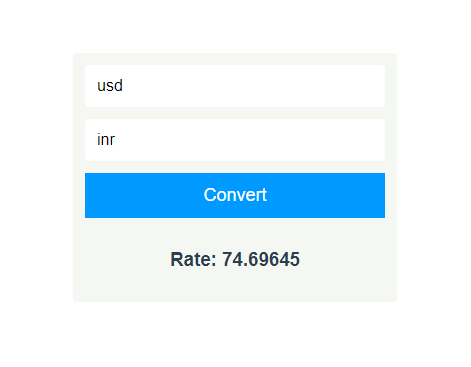
Final output of our vuejs tutorial
What’s next?
This was a very basic tutorial to get you started with vuejs plugin. There are a lot of advanced stuff we can do while building a plugin which we will surely cover in another future tutorial. So make sure you subscribe to our notifications so that you can be one of the first to be notified.
Conclusion
Walah! we have successfully created a Vue plugin. If you like this post please feel free to appreciate it in the comments. Also, if you have any queries or recommendations please ask in the comment section below.
THANK YOU!
One thought on “Vuejs plugin tutorial for beginners”