Today, we will be stepping a step further from one of the previous articles we published on vuejs plugin and will be building a reusable shopping cart plugin in vuejs.
It will have a basic shopping cart setup with the following functionality.
- Add a product to the cart
- Edit product quantity in the cart
- Checkout
Let’s get started, shall we?
Basic working of our vuejs plugin
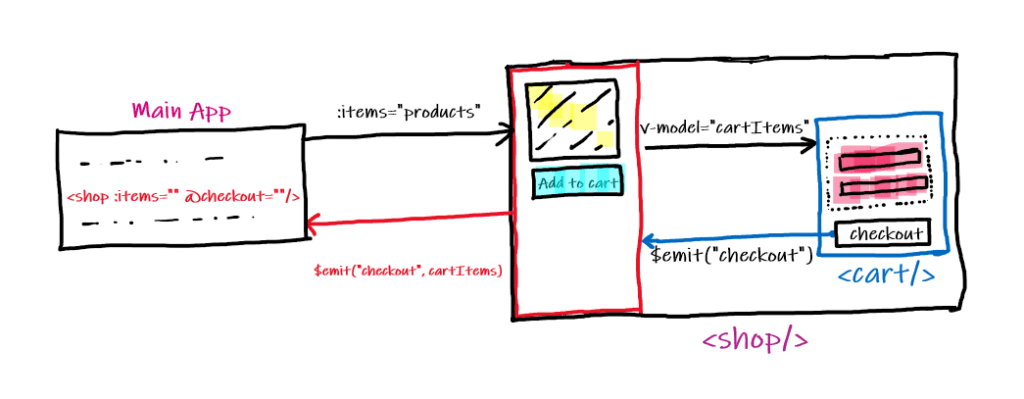
When we import our plugin in a Vue app we pass in a prop and attach an event handler like below.
<Store :items=”products” @checkout=”checkoutHandler”/>
As we can see our plugin has
- :items(prop) – where we pass on an array of products.
- @checkout(event) – on checkout and pass on the list of product ids to checkoutHandler
Apart from that, we can also see that our <Store/> plugin internally has a cart component responsible for rendering our cart items and also for emitting our checkout event whenever a user does a checkout which, then gets passed on to our parent Store component.
Now that we have an overview of what we have to do let’s create a new Vue project
Create a new Vue project
vue create shopping-cart-pluginUnderstand directory structure of our Vue app
- public – contains our main HTML file i.e. index.html.
- plugins – contains our plugin.
- src – contains all of our components and main.js file.
Create a vuejs plugin
Now that we are ready with all the required directories, we create a directory for our plugin inside our plugins directory which will contain the 3 files required for our vuejs plugin.
- Store.vue – this is where display all our store products.
- Cart.vue – this is where we display all our cart items.
- store.js: – will have our plugin’s install method.
Store.vue
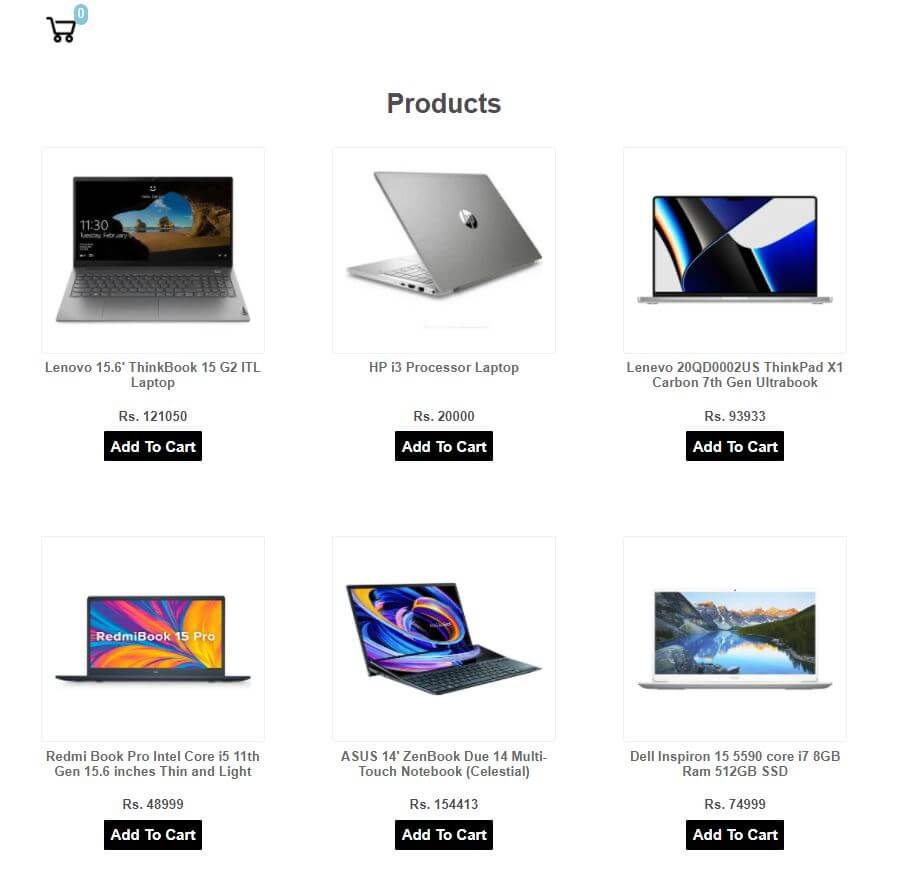
This component takes in a list of products passed on as items props and renders those to the UI of our store. Also inside our store itself, we are keeping track of the items added to our cart via cartItems.
Inside our Store component, we have another component namely <Cart/> to which we are passing on our cartItems(via v-model) which we will come to later in this tutorial.
Now you may be wondering why we have used a v-model instead of a regular prop. Well, that is because we don’t lose our state(quantity in cartItems) each time our <Cart/> component get rerenders and the way to do it is to apply 2-way binding using the v-model. Doing so will make sure that wherever users change product quantity in <Cart/>, those changes get reflected on the cartItems in <Store/>.
Our Cart component also emits the checkout event along with the items in the cart. Whenever the checkout button within it is clicked which is then in return get re-emitted by our Store component.
<template>
  <div class="container">
    <header>
      <nav class="nav">
        <div v-show="section == 'cart'">
          <button
            class="nav-bar__item product-page-btn"
            @click="section = 'product'"
          >
            <font-awesome-icon icon="fas fa-angle-left" size="2x" />
          </button>
        </div>

        <button class="nav-bar__item cart-page-btn" @click="section = 'cart'">
          <font-awesome-icon icon="fa-solid fa-cart-shopping" size="2x" />
          <span class="item-amount">{{ cartItems.length }}</span>
        </button>
      </nav>
    </header>
    <div class="container__item" v-if="section === 'cart'">
      <h1>Cart</h1>
      <Cart
        class="container__item-cart"
        v-model="cartItems"
        @checkout="handleCheckout"
      >
      </Cart>
    </div>
    <div class="container__item" v-else>
      <h1>Products</h1>

      <div class="store">
        <div class="store__item" v-for="item in items" :key="item.id">
          <div class="store__item-details-img">
            <img :src="item.image" />
          </div>
          <div class="store__item-details">
            <h4 class="store__item-details-title">
              {{ item.name }}
            </h4>
            <p>{{ item.description }}</p>
            <h4>Rs. {{ item.price }}</h4>
            <button
              @click="() => addToCart(item)"
              class="store__item-details-add-cart"
            >
              Add To Cart
            </button>
          </div>
        </div>
      </div>
    </div>
  </div>
</template>

<script>
import Cart from "./Cart.vue";
export default {
  name: "Store",
  components: {
    Cart,
  },
  data() {
    return {
      section: "product",
      showCart: false,
      cartItems: [],
    };
  },
  props: {
    items: Array,
  },

  methods: {
    addToCart(product) {
      // see below
    },
    handleCheckout(value) {
      // see below
    },
  },

};
</script>

<style scoped>
* {
  box-sizing: border-box;
  padding: 0;
  margin: 0;
}

header {
  width: 100%;
  position: fixed;
  z-index: 10;
  background-color: rgb(255, 255, 255);
}

.nav {
  max-width: 968px;
  display: flex;
  justify-content: space-between;
  align-items: center;
  margin: 0 auto;
  height: 5rem;
}

.container {
  display: flex;
  flex-direction: column;
  align-items: center;
  width: 100%;
}

.container__item {
  margin: 5rem 0 5rem 0;
}

.container__item-cart {
  width: 100%;
}

.store {
  display: grid;
  grid-template-columns: repeat(3, minmax(250px, 1fr));
  gap: 5em;
  max-width: 968px;
  margin: 0 auto;
}

h1 {
  margin: 2rem auto;
}

.store__item-details-title {
  height: 50px;
  overflow: hidden;
  display: -webkit-box;
  -webkit-line-clamp: 3;
  -webkit-box-orient: vertical;
  margin: 0.5rem auto;
  color: hsl(0, 0%, 41%);
}

.store__item-details-img {
  height: 248px;
  border: 1px solid rgb(240, 239, 239);
  padding: 1rem;
  border-radius: 0.25rem;
}

.store__item-details-img:hover {
  box-shadow: rgba(0, 0, 0, 0.04) 0px 3px 5px;
}

.store__item-details-img img {
  height: 100%;
  width: 100%;
}

.store__item-details-add-cart {
  border: none;
  background-color: black;
  color: white;
  font-size: 18px;
  font-weight: bold;
  cursor: pointer;
  margin: 0.5em auto;
  padding: 0.5rem;
  border-radius: 0.1em;
}

.store__item-details-add-cart:hover {
  box-shadow: rgba(0, 0, 0, 0.09) 0px 3px 12px;
  background-color: rgb(255, 217, 0);
  color: rgb(0, 0, 0);
}

.item-details {
  margin: 1em;
  font-family: "Goudy Bookletter 1911", sans-serif;
  display: flex;
  flex-direction: column;
  background-color: hsl(0, 0%, 100%);
}
.item-amount {
  background-color: hsl(207, 76%, 77%);
  padding: 4px;
  font-size: 15px;
  vertical-align: top;
  margin-left: -10px;
  border-radius: 2em;
  background: var(--first-color);
  color: hsl(0, 0%, 100%);
}

.cart-page-btn,
.product-page-btn {
  cursor: pointer;
  background: none;
  border: none;
}
</style>
addToCart()
This method appends a product with a product id to the cartItems whenever a user clicks on add to cart button.
addToCart(product) {
   const { id, name, price } = product;
   this.cartItems.push({ id, name, price, quantity: 1 });
}
checkout()
This method re-emits the checkout event emitted by our <Cart/> component.
checkout() {
  this.$emit("checkout", this.cartItem);
}
Cart.vue

This component is fairly simple as well. It takes in cartItems passed on to it from our parent <Store/> component. Here we have implemented methods namely changeQuantity & checkout which we will go through in the below section. Apart from that we also have implemented a computed property, total to keep track of the total amount.
<template>
  <div>
    <div v-for="(product, index) in value" :key="product.id">
      <div class="items">
        <div v-show="product.quantity > 0">
          <div class="cart">
            <div class="cart__items-name">
              <h4>
                {{ product.name }}
              </h4>
            </div>

            <div class="cart__items-quantity">
              <button
                class="change-quantity"
                @click="() => changeQuantity(index, +1)"
              >
                <font-awesome-icon icon="fas fa-angle-up" size="2x" />
              </button>
              <span class="cart__items-product-quantity">
                {{ product.quantity }} x {{ product.price }}
              </span>
              <button
                class="change-quantity"
                @click="() => changeQuantity(index, -1)"
              >
                <font-awesome-icon icon="fas fa-angle-down" size="2x" />
              </button>
            </div>

            <div class="product__items-total">
              {{ product.price * product.quantity }}
            </div>
          </div>
        </div>
      </div>
    </div>
    <div class="total">Total : {{ total }}</div>
    <button @click="() => checkout()" class="checkout-btn">CHECKOUT</button>
  </div>
</template>

<script>
export default {
  name: "Cart",
  props: ["value"],
  methods: {
    changeQuantity(index, v) {
      // It handles the change in quantity.
    },

    checkout() {
      // This handles our checkout event.
    },
  computed: {
    total() {
      // This property calculates the Total amount.
    },
  },
};
</script>

<style scoped>
.cart {
  width: 80%;
  display: grid;
  grid-template-columns: 2fr 1fr 1fr;
  margin: 3em auto;
  padding: 0.2em;
  font-size: 1.5em;
  border: 1px solid #fff4ec;
  border-radius: 5px;
}

.cart__items-name {
  justify-self: start;
  padding: 2em;
}

.cart__items-quantity {
  align-self: center;
}

.cart__items-product-quantity {
  flex-direction: column;
  padding: -1em;
  justify-self: center;
  display: flex;
  border-left: 2px solid var(--first-color);
  border-right: 2px solid var(--first-color);
}

.change-quantity {
  border: none;
  background: white;
}

.change-quantity:hover {
  cursor: pointer;
  border: none;
  background: white;
}

.product__items-total {
  align-self: center;
  font-weight: 500;
}

.total {
  max-width: 900px;
  font-size: 1.5em;
  font-weight: bold;
  margin: 2em 0em 2em 25em;
}

.checkout-btn {
  border: none;
  background-color: black;
  color: white;
  font-size: 18px;
  font-weight: bold;
  cursor: pointer;
  margin: 0.5em auto;
  padding: 0.5rem;
  border-radius: 0.1em;
}

.checkout-btn:hover {
  box-shadow: rgba(0, 0, 0, 0.09) 0px 3px 12px;
  background-color: rgb(255, 217, 0);
  color: rgb(0, 0, 0);
}
</style>
changeQuantity(index, v)
This method increment/decrement product quantity in our cart for a particular product.
changeQuantity(index, v) {
   if (this.value[index].quantity + v === 0) {
      return this.value.splice(this.value[index], 1);
   }
   const cart = [...this.value];
   cart[index] = {
        ...cart[index],
        quantity: this.value[index].quantity + v,
   };

   this.$emit("input", cart);
}
checkout()
Here we filter out all the valid cartItems(with quantity > 0) and then emit the final checkout event along with the filtered items.
checkout() {
   const checkoutItems = this.value.filter((cartItem) => {
        return cartItem.quantity > 0;
   });
   if (checkoutItems.length === 0) {
        return;
   }
   this.$emit("checkout", checkoutItems);
}
total()
Computed property to calculate the total amount.
total() {
  const cart = [...this.value];
  return cart
        .map((item) => item.price * item.quantity)
        .reduce((previous, current) => previous + current);
}
Store.js
Last but not the least, we have to create our js file for our plugin containing our install method.
import Store from "./Store.vue";

export default {
  install(Vue) {
    Vue.component(Store.name, Store);
  },
};
Use our vuejs plugin
Once we have successfully created our plugin we can simply register it inside the main.js file of our project by calling the Vue.use() method by passing our plugin as an argument.
/src/main.js
//main.js
import Vue from "vue";
import App from "./App.vue";
import Store from "../plugins/Store.js";
Vue.config.productionTip = false;
Vue.use(Store);

new Vue({
  render: (h) => h(App),
}).$mount("#app");
After that, we can use it as an in our project. Simply head over to a component like App.vue and use it as an element like below
<Store:items="products" @checkOutData="getData" />
App.vue
<template>
  <div id="app">
    <Store :items="products" @checkout="handleCheckout" />
  </div>
</template>

<script>
export default {
  name: "App",
  components: {},
  data() {
    return {
      products: [
        {
          id: 1,
          name: "Lenovo 15.6' ThinkBook 15 G2 ITL Laptop",
          price: 121050,
          image:
            "https://encrypted-tbn1.gstatic.com/shopping?q=tbn:ANd9GcT94OvsH8KjWpkI7PPpBqTu1XrE4fvO662bjjHv2a5-ZXtGTzXCS6Eqmo0sIG-iSueOTKWlGO8VUVqCbIL4MTTWJ47f1tq3oeep0HkjdKNrSYyerF49Kuw&usqp=CAE",
          description: "",
        },
        {
          id: 2,
          name: "HP i3 Processor Laptop",
          price: 20000,
          image:
            "https://encrypted-tbn3.gstatic.com/shopping?q=tbn:ANd9GcQu7L6U1aSM3fnTim7Gq8DecqApyObOOA_FGqcq98Bm2_wsgA5kk51uzuyyjjfpJzouhMr1T60MZRGqjFUktG63nRi8Y-hAVyqZyOpxepI&usqp=CAE",
          description: "",
        },
        {
          id: 3,
          name: "Lenevo 20QD0002US ThinkPad X1 Carbon 7th Gen Ultrabook",
          price: 93933,
          image:
            "https://encrypted-tbn0.gstatic.com/shopping?q=tbn:ANd9GcTV2SOAafgRVScD2_OyqfqEqRizzAdb6UzBHOmuu3IsHmOZq0999pS7zVO36bCBkGX-PpfBb6KebFe6EknAQhkydlkBZn4gj1Dvl2VEPkE4SZfdbZ-AUeu-&usqp=CAE",
          description: "",
        },
        {
          id: 4,
          name: "Redmi Book Pro Intel Core i5 11th Gen 15.6 inches Thin and Light",
          price: 48999,
          image:
            "https://encrypted-tbn1.gstatic.com/shopping?q=tbn:ANd9GcTtlTf2tv21V8JS0elnWjc2XJtfOKOIIQ9rw4LYKTxghEVInWkoT2vbLRSrYOpo2-V2UPMVj8kbAp3DialOC4utalEWMOnqpqsYfaPzHbPNmSx-uzMkh6wj&usqp=CAE",
          description: "",
        },
        {
          id: 5,
          name: "ASUS 14' ZenBook Due 14 Multi-Touch Notebook (Celestial)",
          price: 154413,
          image:
            "https://encrypted-tbn2.gstatic.com/shopping?q=tbn:ANd9GcTvnTWHRnJxwJSBtBgOKS4jv4ygq46Nte6ryHzQYhfJqy8cnpu4yWZ8RVSczWfIawQDlL15hkGoTyADYyIHhrAsbwEgjpPuWV5UaC_ZzIA&usqp=CAE",
          description: "",
        },
        {
          id: 6,
          name: "Dell Inspiron 15 5590 core i7 8GB Ram 512GB SSD",
          price: 74999,
          image:
            "https://encrypted-tbn2.gstatic.com/shopping?q=tbn:ANd9GcT3zAfp-M-J5P4V7n9hgoCe7v-lCBrb2487_YjNS9r8BXSt2bIoUgPB8A0mWJdxf1iFE32-iV_VTefius4t1MIa2C0vshuG2Zuj00tqMOzNv392_hA_YDl_IA&usqp=CAE",
          description: "",
        },
      ],
    };
  },
  methods: {
    handleCheckout(value) {
      console.log(value);
    },
  },
};
</script>

<style>
:root {
  --hue-color: 196;
  --first-color: hsl(var(--hue-color), 57%, 70%);

}
#app {
  font-family: Avenir, Helvetica, Arial, sans-serif;
  -webkit-font-smoothing: antialiased;
  -moz-osx-font-smoothing: grayscale;
  text-align: center;
  color: rgb(78, 76, 80);
}
* {
  box-sizing: border-box;
  padding: 0;
  margin: 0;
}
</style>
Improvement to our vuejs shopping cart plugin?
There are a lot of improvements to be made here. For example, currently, we are emitting the checkout event from within <Cart/> and then we are re-emitting it from our <Store/> component which is well and fine if we have a few components like in this case but, what if we had another component within our <Cart/> and we were emitting the checkout event from within that component instead?
As we can guess we would then need to pass on the event via an additional component and so on. As our plugin grows, doing this becomes quite inefficient. In that case, it is better to use some sort of central store management like vuex instead.
Using vuex, we also wouldn’t need to pass on cartItems to the cart. Instead, we can create our cartItems in our central store and then access it across components in our plugin. We may soon release an article on how to do exactly that in one of our upcoming articles so be sure to subscribe to our notification to get notified as soon as we do that.
Conclusion
Walah! we have successfully made a shopping cart plugin using Vue. I hope you people liked this post. If you like this don’t forget to appreciate it in the comments. Also, if you have any queries feel free to raise them in the comment section below.
THANK YOU!