In this tutorial, we will be trying to deploy one of the previous rabbitmq projects using docker.
Agenda
So what we will be doing is that modify our rabbitmq-nodejs app so that we can deploy it using docker. Basically in that app, we have 3 main functionality namely
1. Image upload functionality.
2. A producer that pushes a task to a queue.
3. A consumer that receives a task and does the image resizing to create thumbnails.
Note: the point of our rabbitmq-nodejs project was to demonstrate one of the use cases of rabbitmq and that is to process long-running tasks efficiently and reliably.
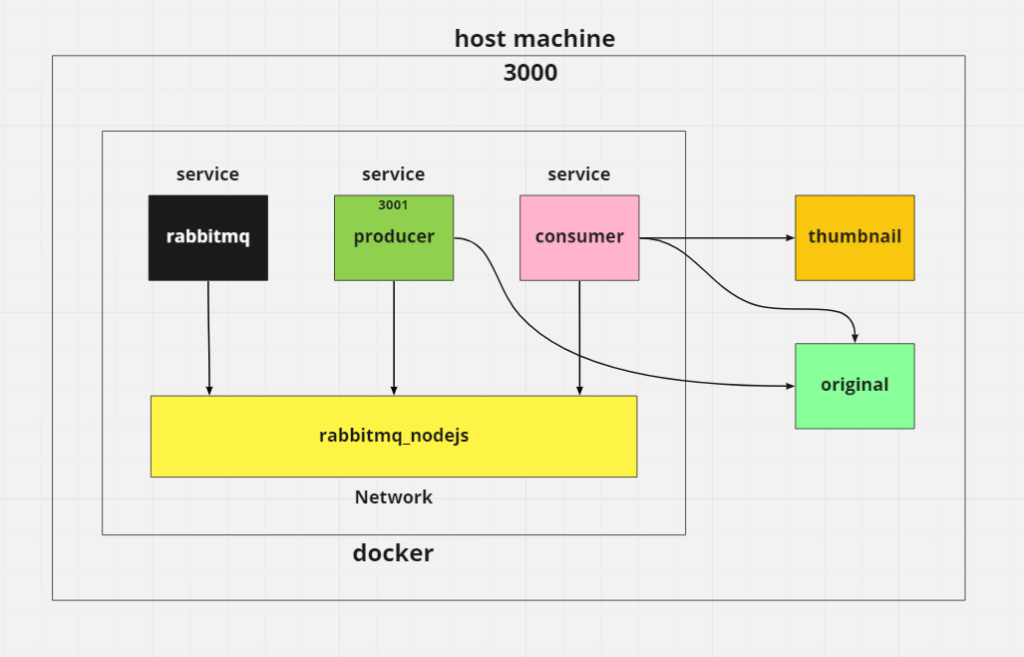
So dockerize the above functionality what we can do is to create 2 separate containers/services
Producer – here goes all the image upload and producer related functionality.
Consumer – here goes all the consumer and image resizing functionality.
We will also need 1 additional service for our RabbitMq instance as this time we will be self-hosting rabbitmq.
So will have 3 services in total and we will use docker-compose to manage those.
Producer
Consumer
RabbitMq
So without further due let’s get started.
Directories of our rabbitmq in docker project
We will rearrange our project with the following structure.
- Producer directory – here goes all producer related logic.
- Consumer directory – here goes all consumer related logic.
- original – here goes all uploaded files.
- thumbnail – here goes all our converted/procesed files
- docker-compose.yml – to manage all our services.
┣ app/
┃ ┣ original/
┃ ┣ thumbnail/
┃ ┣ Producer/
┃ ┃ ┣ services/
┃ ┃ ┃ ┣ rabbitMq.js
┃ ┃ ┣ utils/
┃ ┃ ┃ ┣ function.js
┃ ┃ ┣ index.js
┃ ┃ ┗ Dockerfile
┃ ┃
┃ ┣ Consumer/
┃ ┃ ┣ services/
┃ ┃ ┃ ┣ rabbitMq.js
┃ ┃ ┣ utils/
┃ ┃ ┃ ┣ function.js
┃ ┃ ┣ index.js
┃ ┃ ┗ Dockerfile
┗ docker-compose.yml
Prepare our producer
npm init -y
npm install amqplib dotenv express express-fileupload lodash uuid
The Producer directory contains some files and subdirectories.
- service: contains rabbitMQ.js class file.
- utils : contains function.js which has code logic for creating an exchange and publishing a message exchange (direct exchange).
- index.js : our producer main file.
- Dockerfile : contains logic for creating our producer’s docker image.
RabbitMQ.js
producer/services/rabbitMq.js
const amqp = require("amqplib");
const _ = require("lodash");
class MessageBroker {
  constructor() {
    this.queues = {};
  }

  async init() {
    this.connection = await amqp.connect(process.env.RABBITMQ_URL);
    this.channel = await this.connection.createChannel();
    return this;
  }

  async createEx({ name, type, durable = true }) {
    if (!this.connection) await this.init();
    await this.channel.assertExchange(name, type, { durable });
    this.exchange = name;
    return this;
  }

  /**
   * Send message to and exchange
   * @param {Object} - object defining exchange and routingKey
   * @param {Object} msg Message as Buffer
   */
  async publish({ ex, routingKey }, msg) {
    const queue = `${this.exchange}.${routingKey}`;
    await this.channel.assertQueue(queue, { durable: true });
    this.channel.bindQueue(queue, this.exchange, routingKey);
    this.channel.publish(ex, routingKey, Buffer.from(msg));
  }

  /**
   * @param {Object} - object defining queue name and bindingKey
   * @param {Function} handler Handler that will be invoked with given message and acknowledge function (msg, ack)
   */
  async subscribe({ exchange, bindingKey }, handler) {
    const queue = `${exchange}.${bindingKey}`;
    if (!this.connection) {
      await this.init();
    }
    if (this.queues[queue]) {
      const existingHandler = _.find(this.queues[queue], (h) => h === handler);
      if (existingHandler) {
        return () => this.unsubscribe(queue, existingHandler);
      }
      this.queues[queue].push(handler);
      return () => this.unsubscribe(queue, handler);
    }

    await this.channel.assertQueue(queue, { durable: true });
    this.channel.bindQueue(queue, this.exchange, bindingKey);
    this.queues[queue] = [handler];
    this.channel.consume(queue, async (msg) => {
      const ack = _.once(() => this.channel.ack(msg));
      this.queues[queue].forEach((h) => h(msg, ack));
    });
    return () => this.unsubscribe(queue, handler);
  }

  async unsubscribe(queue, handler) {
    _.pull(this.queues[queue], handler);
  }
}

module.exports = MessageBroker;
function.js
producer/utils/function.js
const fs = require("fs");
const path = require("path")
const { v4: uuid } = require("uuid");
const { promisify } = require("util");

/* START: producer related*/
exports.upload = data => {
  const writeFile = promisify(fs.writeFile);
  return new Promise((resolve, reject) => {
    if (!data) {
      reject("File not available!");
    }
    try {
      const fileName = `img_${uuid()}.jpg`;

      writeFile(path.join(process.env.SRC_DIR, fileName), data);

      resolve(fileName);
    } catch (error) {
      reject(error);
    }
  });
};

/*
we have moved this code out of producer.js(as in our previous rabbitmq project) into functions.js.
*/

exports.publishToExchange = async (instance, { message, routingKey }) => {
    try {
        await instance.createEx({
            name: process.env.EXCHANGE,
            type: 'direct'
        })

        await instance.publish({
            ex: process.env.EXCHANGE,
            routingKey: process.env.BINDING_KEY
        }, message)

        return Promise.resolve()
    } catch (error) {
        return Promise.reject(error)
    }
}
/* END: producer related*/
index.js
producer/index.js
const express = require("express");
const Broker = require("./services/rabbitMQ");
const fileUpload = require("express-fileupload");
const { publishToExchange, upload } = require("./utils/function");

const app = express();
const RMQProducer = new Broker().init();
app.use(fileUpload());

app.use(async (req, res, next) => {
  try {
    req.RMQProducer = await RMQProducer;
    next();
  } catch (error) {
    process.exit(1);
  }
});

// your routes here
app.post("/upload", async (req, res) => {
  const { data } = req.files.image;
  try {
    const message = await upload(data);

    await publishToExchange(req.RMQProducer, {
      message,
      routingKey: process.env.BINDING_KEY,
    });

    res.status(200).send("File uploaded successfully!");
  } catch (error) {
    res.status(400).send(`File not uploaded!`);
  }
});

app.use((req, res, next) => {
  next(creatError.NotFound());
});

// error handling
app.use((err, req, res, next) => {
  res.status(err.status || 500).send({
    error: {
      status: err.status || 500,
      message: err.message,
    },
  });
});
app.listen(process.env.PORT || 3001, () => {
  console.log("server is running", process.env.PORT || 3001);
});

process.on("SIGINT", async () => {
  process.exit(1);
});
process.on("exit", (code) => {
  RMQProducer.channel.close();
  RMQProducer.connection.close();
});
Dockerfile
Now we are ready to prepare our Dockerfile for our producer to be able to use in our final docker-compose file.
producer/Dockerfile
# we use node v14 as our base image

FROM node:14

# WORKDIR instruction sets the working directory for any RUN, CMD, ENTRYPOINT, COPY and ADD instructions that follow it in the Dockerfile.
# If WORKDIR is not present, it's like RUN mkdir producer && cd producer and if already present it's like cd producer

WORKDIR /producer

# copying package.json(file path wrt to our Dockerfile) from host to container path wrt WORKDIR(/producer), you can use ADD too but copy is recommended

COPY package.json .

# installing all dependencies. RUN Builds a new layer over an existing image by committing the results.

RUN npm install

# copying rest of the code fileS from host(/Producer) to container(/producer)
# First . represents location of our code file wrt our Dockerfile, while the second . represents path wrt WORKDIR(/producer)

COPY . .

# CMD takes in our command as an array. For each Dockerfile we should have only 1 CMD else all other CMD expect the last one are ignored.

CMD ["npm", "start"]
Prepare our consumer
Similar to Producer our Consumer also contains some files and subdirectories.
- services : contains rabbitMQ.js class file
- utils : contains function.js.
- index.js: contains the code logic for handling image conversion.
- Dockerfile: contains logic for creating our consumer’s docker image.
function.js
consumer/utils/function.js
const fs = require('fs')

exports.fileExists = (path, flag = 1) => {
    return new Promise(function (resolve, reject) {
        let accessConst = null
        if (flag === 2) accessConst = fs.constants.W_OK
        else accessConst = fs.constants.R_OK
        fs.access(path, accessConst, (err) => {
            if (err) {
                if (err.code === 'ENOENT') resolve(false)
                else reject(err)
            } else resolve(true)
        })
    })
}
index.js
consumer/index.js
const fs = require("fs");
var path = require("path");
const sharp = require("sharp");
const { promisify } = require("util");

const Broker = require("./services/rabbitMQ");

const { fileExists } = require("./utils/functions");

const RMQConsumer = new Broker().init();
const pipeline = promisify(require("stream").pipeline);

/**
 * Process 1:1 message and stores in db, also processes group messages 1 by 1
 * @param {String} payload - message in json string format
 * @param {Function} ack - callback function
 */
const handleImage = async (payload, ack) => {
  try {
    const fileName = payload.content.toString();
    const fileUrl = path.join(process.env.SRC_DIR, fileName)

    // we first need to make sure if the file exist and is readable
    const exists = await fileExists(fileUrl);

    if (!exists) {
      ack();
      throw new Error(`ERR:FILE ${fileUrl} not readable`);
    }
    // we create a read stream
    const readStream = fs.createReadStream(fileUrl);

    let transform = sharp();

    const [width, height] = [process.env.WIDTH, process.env.HEIGHT];

    // we resize the image
    transform = transform.resize(width || 250, height || 150);

    // we pipe our readstream to a writestream
    pipeline(
      readStream.pipe(transform),
      fs.createWriteStream(path.join(process.env.DEST_DIR, fileName))
    );
    // we acknowledge the delivery
    ack();
  } catch (error) {
    console.error(error);
  }
};

async function processUploads() {
  try {
    const consumer = await RMQConsumer;
    await consumer.createEx({
      name: process.env.EXCHANGE,
      type: "direct",
    });
    consumer.subscribe(
      { exchange: process.env.EXCHANGE, bindingKey: process.env.BINDING_KEY },
      handleImage
    );
  } catch (error) {
    console.log(error);
  }
}

processUploads();

// close channek, connection on exit
process.on("exit", (code) => {
  RMQConsumer.channel.close();
  RMQConsumer.connection.close();
});
Dockerfile
consume/Dockerfile
FROM node:14

WORKDIR /Consumer

COPY package.json .

COPY . .

RUN npm install

RUN npm install [email protected]

CMD ["npm", "start"]
Create our docker-compose file
Now that we have successfully created our docker images, let’s bring in all the pieces together in a neat docker-compose file and configure all of the services of our nodejs app.
services:
We have three services namely rabbitmq, producer, and consumer.
services:
  rabbitmq: # rabbitmq service
  producer: # producer service
  consumer: # consumer service
networks:
By default Compose sets up a single network for our app. Each container for a service joins the default network and is both reachable by other containers on that network, and discoverable by them at a hostname identical to the container name.
source: Docker
For instance, by default compose will create a network name like “[project_dirname]_default” using the bridge driver. But let’s create our own network named rabbitmq_nodejs.
networks:
  rabbitmq_nodejs:
We can provide many options when creating a network like a network driver but, If not provided it is a bridge driver is automatically assigned or else we can add it manually too.
networks:
  rabbitmq_nodejs:
    driver: bridge
volumes:
We have created two named volumes original_images and thumbnail_images so that our data(images) persists even after we restart or remove the containers. original_images is accessible to the producer while original_images & thumbnail_images both are accessible to our consumer.
volumes:
  original_images:
  thumbnail_images:
Do note that named volumes are created inside /var/lib/docker/volume and it’s not a problem in many cases but, if we want to specify a custom directory on the host machine we need to use Bind mounts. They are similar to named volumes with the additional benefit that they allow us to provide a custom host directory for our volume mapping.
As we’ll be using bind mounts we can omit the named volumes for now and so below will be our structure of the docker-compose.yml file.
version: "3"
services:
  rabbitmq:
    # Holds the logic for our rabbitMQ container

  producer:
    # Holds the logic for our producer container

  consumer:
    # Holds the logic for our consumer container

networks:
  rabbitmq_nodejs:
So, let’s fill in each of the service’s details one by one.
rabbitmq:
Firstly we have configured our rabbitmq service as follows:
- image : here we directly use the official rabbitmq image
- container_name : then we have chosen the container name as
rabbitmq, this will be important when reffering to this service from another service. - restart : set it to unless-stopped so that, unless we manually stops the container it restarts on crash & reboot.
- port : expose 5673 of our container. If you want to access Rabbitmq manager dashboard of container directly from our host we can also expose port 15673 and map it out host’s 15673 port.
- volumes : here we will do our volume mapping.
- environment : provide in our environment variable if any here.
- networks : here we provide the network name on which we want out service to be available. If you want your service to be available on multiple networks we can provide that too here.
rabbitmq:
    image: rabbitmq:3.8-management-alpine
    container_name: "rabbitmq"
    restart: unless-stopped
    ports:
      - 5673
      - 15673:15672
    volumes:
      - ~/.docker-conf/rabbitmq/data/:/var/lib/rabbitmq/
      - ~/.docker-conf/rabbitmq/log/:/var/log/rabbitmq
    environment:
      RABBITMQ_ERLANG_COOKIE: ${RABBITMQ_ERLANG_COOKIE}
      RABBITMQ_DEFAULT_USER: ${RABBITMQ_DEFAULT_USER}
      RABBITMQ_DEFAULT_PASS: ${RABBITMQ_DEFAULT_PASS}
    networks:
      - rabbitmq_nodejs
producer:
- build : here we provide the path our our producer’s Dockerfile. Here it is “./Producer“
- depends_on : this ensures that rabbitmq service is running before the producer service starts so that our producer services doesn’t crash when it tries to connect to an unavaible rabbitmq connection.
- restart : same as our rabbitmq service.
- port : as we want our producer(on port 3001) to be available from our host port 3000.
- environment: our producer requires a url our our rabbitmq instance to connect.
RABBITMQ_URL: "amqp://guest:guest@rabbitmq"
- volumes : our producer needs to access ./app/original
/directory on our host machine to upload images so, we’ll use bind mounts to mount/producer/original/inside container to that to ./app/original/on the host machine. - networks : we also want our producer to be available on our network rabbitmq_nodejs so that it can communicate with the rabbitmq service available on the same network.
producer:
    build: ./Producer
    container_name: "image_uploader_producer"
    depends_on:
      - rabbitmq
    restart: unless-stopped
    ports:
      - "3000:3001"
    environment:
      RABBITMQ_URL: "amqp://guest:guest@rabbitmq"
      SRC_DIR: "./original"
      EXCHANGE: "upload"
      PORT: 3001
    volumes:
      - ./app/original/:/Producer/original/
    networks:
      - rabbitmq_nodejs
consumer:
Lastly, we have consumer service which we have configured as follow:
- build : same as our poducer. Here it is “./Consumer“
- depends_on : same reason as our producer.
- restart : same as our rabbitmq service.
- port : here we don’t want the consumer to be available from the host machine and as our producer can communicate with our consumer directly via our rabbitmq_nodejs network here we skip port mapping.
- environment: same as our producer.
- volumes : apart from the “./app/original directory we need to map 1 extra volume and that is “./app/thumbnail” on our host machine to our container’s as our consumer need access to both.
- networks : same as producer.
consumer:
    build: ./Consumer
    container_name: "image_uploader_consumer"
    restart: unless-stopped
    depends_on:
      - rabbitmq
    environment:
      RABBITMQ_URL: "amqp://guest:guest@rabbitmq"
      SRC_DIR: "./original"
      DEST_DIR: "./thumbnail"
      EXCHANGE: "upload"
      BINDING_KEY: "image"
      WIDTH: 400
      HEIGHT: 300
    volumes:
      - ~/original/:/Consumer/original/
      - ~/thumbnail/:/Consumer/thumbnail/
    networks:
      - rabbitmq_nodejs
Final docker-compose file for our rabbitmq project
version: "3"
services:
  rabbitmq:
    image: rabbitmq:3.8-management-alpine
    container_name: "rabbitmq"
    restart: unless-stopped
    ports:
      - 5673
      - 15673:15672
    volumes:
      - ~/.docker-conf/rabbitmq/data/:/var/lib/rabbitmq/
      - ~/.docker-conf/rabbitmq/log/:/var/log/rabbitmq
    environment:
      RABBITMQ_ERLANG_COOKIE: ${RABBITMQ_ERLANG_COOKIE}
      RABBITMQ_DEFAULT_USER: ${RABBITMQ_DEFAULT_USER}
      RABBITMQ_DEFAULT_PASS: ${RABBITMQ_DEFAULT_PASS}
    networks:
      - rabbitmq_nodejs

  producer:
    build: ./Producer
    container_name: "image_uploader_producer"
    depends_on:
      - rabbitmq
    restart: unless-stopped
    ports:
      - "3000:3001"
    environment:
      RABBITMQ_URL: "amqp://guest:guest@rabbitmq"
      SRC_DIR: "./original"
      EXCHANGE: "upload"
      PORT: 3001
    volumes:
      - ./app/original/:/Producer/original/
    networks:
      - rabbitmq_nodejs

  consumer:
    build: ./Consumer
    container_name: "image_uploader_consumer"
    restart: unless-stopped
    depends_on:
      - rabbitmq
    environment:
      RABBITMQ_URL: "amqp://guest:guest@rabbitmq"
      SRC_DIR: "./original"
      DEST_DIR: "./thumbnail"
      EXCHANGE: "upload"
      BINDING_KEY: "image"
      WIDTH: 400
      HEIGHT: 300
    volumes:
      - ~/original/:/Consumer/original/
      - ~/thumbnail/:/Consumer/thumbnail/
    networks:
      - rabbitmq_node

networks:
  rabbitmq_nodejs:
Conclusion
Finally, we are done and we went through all the steps required to deploy one of our previous rabbitmq projects using docker-compose. We created Dockerfile for each of the services and also had a look at custom networks and Bind mounts. If you have any doubts or questions please feel free to leave a comment down below. Show us your love by sharing it with your friends and social media.
Thank you for reading.


One thought on “RabbitMQ in docker”