Hi guys, in this tutorial we’ll try to walk you guys through the entire process of designing and building a telegram bot for crypto price notification from scratch using the telegram bot API. Although the demo for this tutorial is around crypto price alerts, the same idea can easily be extended to create notification systems for say product prices on an e-commerce site, etc. So let’s get started, shall we?
Agenda
To create a telegram notification bot that will allow users to
- Set a notification for a particular pair & price combination.
/notify BTC-USDT 20000 - List all saved notifications.
/notifyall - Cancel all existing or particular notifications.
/notifycancel
/notifycancelall
A basic overview of how the entire system will work is as below.
- A user will set/save a notification using the /notify command for a particular pair+price combination.
- Upon receiving the command we save the notification in a database, Redis in this case for fast access.
- After that we make our bot listen to real-time price data via Binance’s WebSocket API in case we aren’t already doing so for that particular pair.
- Now, for each real-time pair+price data we receive on our WebSocket we check if we have corresponding notifications that satisfy our current pair + price combination in our database using Redis search.
- If we do have notifications we’ll notify the user via a telegram message.
Prerequisites
- Basic knowledge of telegram webhook API. We already have that covered in one of our previous articles which you can check here.
- We will be using Redis as our database so you must have it installed on your system.
- Also, we will be subscribing to real-time price data via Binance’s WebSocket API for which you will need Binance’s API key and Secret.
Project initialization and packages installation
We start by typing in the below commands to initialize our project and install all required dependencies.
npm init -y
npm install express axios redis node-binance-api query-string dotenv module-alias
Directory Structure
Our directory structure for this project will be something like the below and don’t bother about files for now as we will get to them shortly.
TelegramBot/
┣ base/
┃ ┗ index.js
┣ telegram-notify-bot/
┃ ┣ dao.js
┃ ┣ index.js
┃ ┣ keyGenerator.js
┃ ┣ pairCollection.js
┃ ┗ utils.js
┣ redis/
┃ ┗ client.js
┣ request/
┃ ┗ http.js
┣ .env
┣ app.js
┣ config.js
┣ package-lock.json
┗ package.json
Now we all can agree that dealing with nested paths while requiring a file in our project can be tedious and confusing especially if we have a lot of files grouped into directories. Therefore to solve this and make our life a bit easy we are using the module-alias package and creating aliases of directories to make our imports more readable and maintainable without having to remember the exact path to files.
"_moduleAliases": {
    "@root": ".",
    "@TelegramNotifyBot": "./telegram-notify-bot",
    "@Queue": "./redis-queue",
    "@Redis": "./redis"
},
Let’s also fill our .env file with the required data.
BINANCE_API_KEY=binance's API key
BINANCE_API_SECRET=binance's API secret
TELEGRAM_API_BASE_URL=https://api.telegram.org
TELEGRAM_API_KEY=Telegram Bot API key
SERVER_PORT=4000
SERVER_HOST=HTTPS Webhook URL[In this case ngrok's URL]
Create a Base class for our telegram bot
Let’s create a BaseBot class that will automatically take care of functionality like setting up a webhook connection and sending messages to the users. By doing so we can extend it to create our telegram price alert bot.
It has the following methods:
- run() 🠪 responsible for starting an express server and setting up our bot to listen on webhook URL for events from telegram API.
- setUpWebhook(query) 🠪 responsible for registering our webhook URL with telegram bot API.
- sendText(msgObj) 🠪 sends a text message.
- processCMD(req, res) 🠪 to set up the commands for the bot. This method needs to be overwritten by any bot inheriting our BaseBot.
- cmdNotSupported(id) 🠪 sends a generic “Command Not Supported” message. It can be used by not inheriting our BaseBot.
const qs = require('query-string');

module.exports = function (express = null) {
    return class BaseBot {
        constructor({ key, baseUrl, webhook = null }, http,) {
            this.token = key;
            this.botUrl = `${baseUrl}/bot${this.token}`;
            this.http = http;
            this.webhook = webhook;
        }

        run() {
            if (!express) throw new Error('Express is required');

            if (!this.webhook) throw Error('Webhook settings required');

            const { port = 8000, path = "/", params = {} } = this.webhook;

            const app = express();
            app.use(express.json());

            app.post(`/webhook/${this.token}`, this.processCMD.bind(this));

            app.listen(port, async function () {
                try {
                    const query = BaseBot.stringifyQuery({
                        url: `${path}/webhook/${this.token}`,
                        ...params,
                    });
                    await this.setupWebhook(query);
                    console.log(`Bot is up and Running at PORT : ${port}`);
                } catch (error) {
                    console.log(error);
                }

            }.bind(this));
        }

        setupWebhook(query) {
            return this.http.get(`${this.botUrl}/setWebhook?${query}`);
        }

        async processCMD(req, res) {
            throw new Error('processCMD method must be implemented');
        }

        sendText(msgObj) {
            return this.http.post(`${this.botUrl}/sendMessage?${BaseBot.stringifyQuery(msgObj)}`);
        }

        cmdNotSupported(id) {
            return this.sendText({
                chat_id: id,
                text: 'Command Not Supported',
            });
        }

        static stringifyQuery(query) {
            return qs.stringify(query);
        }
    }
}
Redis keyGenerator for our telegram bot
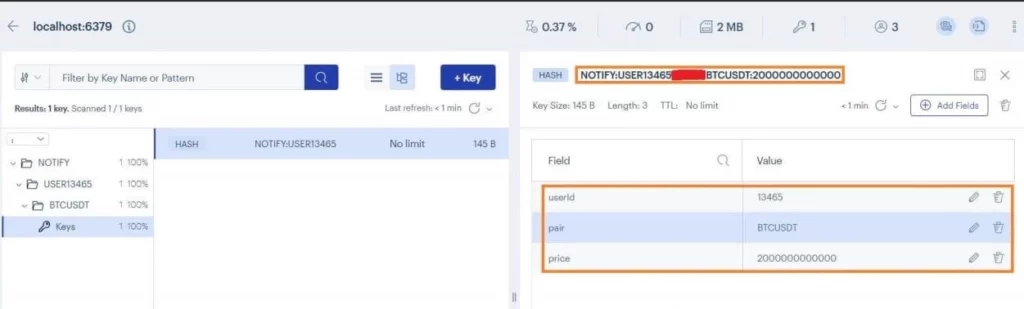
For each user notification, we create a corresponding Redis HASH whose
key 🠪 NOTIFY:USER:{id}:{pair}:{price}
eg: NOTIFY:USER:123:BTCUSDT:2000
and field-value pairs as below
HSET NOTIFY:USER:123:BTCUSDT:2000 userId 123 pair “BTCUSDT” price 2000
To make key generation easy we need to create a method that does it for us automatically so we don’t have to deal with it each time manually.
module.exports = {
    userNotification: (id, pair, price) => `NOTIFY:USER${id}:${pair}:${price}`,
}Note: in practice, we multiply the user-provided price by 108 when storing it in the database to avoid issues with decimal prices. Eg if a user inputs say 2000, we store the result of 2000 x 108 in our database. Check out the code.
Create DAO(Data Access Object) for our telegram bot
Now to interact with our Redis DataBase we have implemented a Data Access Object(DAO) that provides us with an abstract interface to
- save({userId, pair, price}) 🠪 saves user notification details to the database.
- del({ userId, pair, price }) 🠪 deletes a user notification from the database.
- delAll(documents) 🠪 deletes all notifications for a user.
- find(attributes) 🠪 performs a search operation on the database. To understand the use of the Redis search command please read here.
Suppose let’s say we want to find all records whose pair = BTCUSDT and price is around 19999.95. That would translate to the below Redis command.
FT.SEARCH idx:notification “@pair:{BTCUSDT} @price:[1997995005000 2001994995000]”
Read below for more explanation on our calculation above.
const { SchemaFieldTypes } = require('redis');
const { userNotification } = require('./keyGenerator');

module.exports = function (redis) {
    return {

        // we need to create index for our redis search to work

        createIndex(name) {
           return redis.ft.create(name, {
                  userId: {
                      type: SchemaFieldTypes.NUMERIC,
                      sortable: true
                  },
                  pair: SchemaFieldTypes.TAG,
                  price: SchemaFieldTypes.NUMERIC
               },
               {
                  ON: 'HASH',
                  PREFIX: 'NOTIFY:USER:'
               }
           );
        },

        save({ userId, pair, price }) {
            return redis.HSET(userNotification(userId, pair, price), { userId, pair, price });
        },

        del({ userId, pair, price }) {
            return redis.DEL(userNotification(userId, pair, price));
        },

        delAll(documents) {
            const allActiveNotifications = []
            documents.forEach(function (document) {
                allActiveNotifications.push(redis.DEL((document.id)))
            })
            return allActiveNotifications
        },

        find(attributes) {

            return redis.ft.search(
                `idx:notification`,
                attributes.reduce((tot, [key, value], idx) => `${tot}${(idx && " ") || ""}@${key}:${value}`, '@')
            );
        },
    }
}
Create PriceNotificationBot subclass
The first thing we need to do is to extend the BaseBot class we discussed above. Then, we will need to prepare our bot to accept commands from the user which we do so by overwriting the processCMD method of our BaseBot class.
To get an idea of all the commands we need to support read here.
const BaseBot = require('@root/base');
const Binance = require("node-binance-api");
const isValidPair = require('./utils')
const dao = require('./dao');

const binance = new Binance();
module.exports = (express) => class PriceNotificationBot extends BaseBot(express) {
    constructor(ctx, http) {
        const { key, baseUrl, redis, BINANCE_API, BINANCE_SECRET_KEY, tolerance, webhook } = ctx;
        super({ key, baseUrl, webhook }, http);
        this.dao = dao(redis);
        this.subscribed = new Set();
        binance.options({
            BINANCE_API,
            BINANCE_SECRET_KEY,
        });

        this.tolerance = tolerance || 0.1;

        this.run(this.processCMD.bind(this));
    }

    async initIndex(name) {
        // creating index for redis search to work
        try {
            await this.dao.createIndex(name);
        } catch (error) {
            //console.log(error);
        }
    }

    async processCMD({ body }, res) {
        if ('message' in body) {
            const { message: { chat: { id } } } = body
            let [cmd, pair, price] = (body?.message?.text ?? '').split(' ');

            if (!(["/notifyall", "/notifycancelall"].includes(cmd) || pair && price)) cmd = ""

            try {
                switch (cmd) {
                    case '/start':
                        await this.start(id);
                        break;
                    case '/notify':
                        await this.registerNotification({ id, pair, price });
                        break;
                    case '/notifyall':
                        await this.listNotifications(id);
                        break;
                    case '/notifycancel':
                        await this.cancelNotification({ id, pair, price });
                        break;
                    case '/notifycancelall':
                        await this.cancelAllNotification(id);
                        break;
                    default:
                        await this.cmdNotSupported(id);
                }
            } catch (error) {
                // console.log("Oops something went wrong")
            }
        }
        res.status(200).send("ok");
    }
Now let’s discuss each of the methods for our telegram price notification bot.
start(id)
This method handles the generic /start command of our telegram bot. Whenever a user sends the /start command it responds with a Guide to using the bot.
async start(id) {
        try {
            const text = `Guide to use this BOT:\n
                    This bot sends notification of chosen pair of Cryptocurrency from Binance
                    Commands: /notify : /notify BTC-USDT 20000
                    /notifyall: to get list of all notification
                    /notifycancel: /notifycancel BTC-USDT 20000
                    /notifycancelall: to cancel all subscribed Pairs`;

            // we call the sendText method of parent class
            await this.sendText({
                chat_id: id,
                text
            });

        } catch (error) {
            console.log(error);
        }
}
registerNotification({ id, pair, price })
As the name implies this method saves a user-provided notification to our Redis database.
async registerNotification({ id, pair, price }) {

        let msg;
        pair = pair.toUpperCase();

        try {
            // only call listenToBinance if we haven't included the pair before
            if (!this.subscribed.has(pair)) {
                this.listenToBinance(pair);
                this.subscribed.add(pair);
            }

            // check pair validity
            if (!isValidPair(pair)) throw Error('🔴 Invalid pair');

            let numRecords = 0;

            numRecords = await this.dao.save({
                userId: id,
                pair: pair.replace('-', ''),
                price: Math.trunc(price * 1e8),
            });

            if (numRecords < 3) throw Error(`🔴 Error saving notification`);

            msg = `🟢 Subscribed to ${pair} at ${price}`;

        } catch (error) {

            msg = error.message;

        } finally {
            // send message
            return this.sendText({
                chat_id: id,
                text: msg,
            });
        }
    }
listenToBinance(pair)
This method does the following tasks.
- Firstly, it listens to the real-time price feed from Binance for multiple pairs. Now we don’t listen to data from all the pairs at once but only include a pair when a user saves a notification for a particular pair. Doing so ensures that we aren’t listening for a whole bunch of pairs unnecessarily.
- Secondly, for each real-time data feed(price) for a pair we receive, we try to find all matching notifications for that pair that fall within a range of prices in our database. The reason we are including a price range for searching is that many times the price we may receive from WebSocket may not be the same as the price a user has saved. In that scenario, a user won’t receive a notification, and therefore to avoid that issue for each price we receive from WebSocket data we create a range with some tolerance.
Eg Imagine this scenario. Let’s suppose a user has set a notification for a pair say BTCUSDT @20000.50
now for the pair BTCUSDT, we receive the consecutive price feed in the following order.
1st price 🠪 19999.95 @t=0
2nd price 🠪 20000.80 @t=t + 1
Now if we try to search for the exact price our notification may not get triggered even though the BTCUSDT price touched the price set by our user.
That is why we create a range(based on some tolerance say 0.1%) like below
1st price 🠪 19999.95 @t=0 🠪 [(19999.95 * 0.999 * 108) (19999.95 * 1.001 * 108)]
As you can see doing so works and notifications get triggered. - Finally, it sends a message/notification to all the qualifying users.
Now there are things we can improve here regarding how we deliver the messages to the users. Currently, solely for the purposes of this tutorial, we are sending the message from the method itself instead of implementing a producer-consumer setup.
listenToBinance(pair) {
        pair = pair.replace('-', '');
        binance.websockets.chart(pair, "1m", async (symbol, interval, chart) => {
            const closePrice = parseFloat(chart[binance.last(chart)].close);

            /*
               closePrice * (1 - this.tolerance/100)  * 1e8

               or equivalently

               closePrice * (100 - this.tolerance)  * 1e6
            */
            const lowerBound = Math.trunc(closePrice * (100 - this.tolerance)  * 1e6);
            const upperBound = Math.trunc(closePrice * (100 + this.tolerance) * 1e6);

            try {
                const { total, documents } = await this.dao.find([
                    ['pair', `{${symbol}}`],
                    ['price', `[${lowerBound} ${upperBound}]`]
                ]);

                if (total > 0) {
                    await Promise.allSettled(documents.map(({ value }) => this.notifyAndDelete(value)));
                }
            } catch (error) {
                // console.log(error.message)
            }
        });
    }
notifyAndDelete(value)
This methods send a notification message and delete the notification from the database. Do note that in a future tutorial we will offload this functionality to a separate consumer.
async notifyAndDelete(value) {
        const { userId, pair, price } = value;
        try {

            await this.sendText({ chat_id: userId, text: `🟢 ${pair} reached ${(price * 1e-8).toFixed(8)}` });
            await this.dao.del(value);

        } catch (error) {
            console.log(error.message);
        }
    }
listNotifications(id)
This method lists out all the notifications for a particular user.
async listNotifications(id) {
        let msg;

        try {
            // search all records for a particular userId/chatId
            const { total, documents } = await this.dao.find([
                ['userId', id]
            ]);

            if (total <= 0) throw Error('🔴 You have no active notifications');

            documents.map(({ value }) => value);

            msg = 'Your subscriptions\n';
            // send message
            msg = documents.reduce(
                (tot, { value: { pair, price } }) => `${tot}\n✅ ${pair} at ${(price * 1e-8).toFixed(8)}`,
                msg);
        } catch (error) {

            msg = error.message;

        } finally {
            return this.sendText({
                chat_id: id,
                text: msg,
            });
        }
    }
cancelNotification({ id, pair, price })
This method cancels a user’s notification by deleting it from our database.
async cancelNotification({ id, pair, price }) {

        let msg;
        pair = pair.toUpperCase();

        try {
            // check pair validity
            if (!isValidPair(pair)) throw Error('🔴 Please Enter valid details');
            const numRecords = await this.dao.del({
                userId: id,
                pair: pair.replace('-', ''),
                price: Math.trunc(price * 1e8)
            });

            if (!numRecords) throw Error(`🔴 You haven't subscribed for ${pair} at ${price}`);
            msg = `🟢 Unsubscribed ${pair} at ${price}`;

        } catch (error) {
            msg = error.message;
        } finally {
            return this.sendText({
                chat_id: id,
                text: msg,
            });
        }

    }
cancelAllNotification(id)
This method deletes all the saved notifications for a particular user.
async cancelAllNotification(id) {

        let msg;

        try {
            // search all records for a particular userId/chatId
            const { total, documents } = await this.dao.find([
                ["userId", id]]);

            if (total <= 0) throw Error('🔴 You have not active notifications');

            const numRecords = this.dao.delAll(documents);

            await Promise.all(numRecords);
            if (!numRecords) throw Error(`🔴 Error deleting notifications`);

            msg = `🟢 Deleted all notifications`;

        } catch (error) {

            msg = error.message;

        } finally {
            return this.sendText({
                chat_id: id,
                text: msg,
            });
        }
    }
Create Util functions
isValidPair(pair)
For a given pair, this method checks against a list of all supported pairs. This is to ensure that we ignore all invalid pairs submitted by a user.
const pairs = require("@TelegramNotifyBot/pairCollection")

module.exports = function isValidPair(pair) {
    const [base, quote] = pair.split("-")
    return pairs?.[quote].includes(base)
}
Below is a list of all pair combinations we currently support in our telegram price notification bot which you can of course extend to include more pairs.
module.exports = {
    BTC: [
        'ADA', 'AE',
        'BAT', 'BCHABC', 'BNB', 'BTS',
        'CND',
        'DASH',
        'EOS', 'ETC', 'ETH',
        'GAS', 'GNT', 'GO', 'GXS',
        'HOT',
        'ICX', 'IOTA',
        'LINK', 'LSK', 'LTC',
        'NANO', 'NEO',
        'OMG', 'ONT',
        'POLY',
        'QKC', 'QSP', 'QTUM',
        'REP',
        'SC', 'STEEM',
        'TRX',
        'VET',
        'WAN', 'WAVES', 'WPR', 'WTC',
        'XLM', 'XMR', 'XRP', 'XVG',
        'ZIL', 'ZRX'
    ],
    ETH: [
        'ADA',
        'BAT', 'BNB',
        'DASH',
        'EOS', 'ETC',
        'HOT',
        'LTC',
        'NEO',
        'OMG',
        'QKC', 'QSP', 'QTUM',
        'SC',
        'TRX',
        'VET',
        'WAN',
        'XMR',
        'ZIL',
    ],
    USDT: [
        'ADA',
        'BCHABC', 'BNB', 'BTC',
        'EOS', 'ETC', 'ETH',
        'ICX', 'IOTA',
        'LTC',
        'NEO',
        'ONT',
        'QTUM',
        'TRX',
        'VET',
        'XLM',
        'XRP'
    ]
}
Note: This is an old file that we copy pasted, so please make sure to check if Binance still supports your pair before using it in the bot.
Create HTTP module
We have created our HTTP module using Axios which has nothing much going on as of right now but, can be improved by managing errors, etc.
const { get, post } = require('axios');
module.exports = {
    get, post
}
Create an instance of our telegram bot subclass
Finally, we reached the end of this tutorial. So let’s give our telegram crypto price notification bot a try.
require('module-alias/register');
const { server: { host, port }, telegram: { baseUrl, key }, binance: { binanceKey, secret } } = require("@root/config");
const http = require("@root/request/http")
const express = require('express');
const { client } = require('@root/redis/client')
const priceNotificationBot = require("@TelegramNotifyBot")(express);

async function start() {
   const newBot = new priceNotificationBot({
      key,
      baseUrl,
      redis: client,
      BINANCE_API: binanceKey,
      BINANCE_SECRET_KEY: secret,
      tolerance: 0.1; // in percentage
      webhook: {
          port,
          path: host,
          params: { drop_pending_updates: true }
      }
   }, http);

   await newBot.initIndex("idx:notification");
};

start();
Things to be improved in our telegram bot
Currently, in our listenToBinance method, we are searching for matching notifications. And upon finding we are sending the notification messages to the qualified users from the method itself. This may be okay from a developmental perspective but imagine we have a large no of users using our bot. In those scenarios, we may need to send messages to a large number of users. Doing so can create a lot of back pressure within our system as sending a lot of messages takes time. To solve this we can make use of a queue system(RabbitMq) to offload the send message task to multiple consumers at once.
We may come up with another article implementing the above. So do make sure to subscribe to our notifications. I am sure there are a lot of other things that can be improved upon this. Do let us know your suggestions in the comments below.
Conclusion
In this tutorial, we learned to build a simple telegram price notification bot. I hope you like this post and in case you have any doubts or questions please feel free to leave a comment down below otherwise show us your love by sharing it with your friends and on social media.