Hi guys, in this telegram bot tutorial series, we will explore the Telegram API and learn to build an image compression bot using the webhook way. Although there are various libraries we can make use of like telegraf, node-telegram-bot-api, etc. However, for a deeper understanding, we will be taking a more bare-bone approach.
Agenda
We will learn to
- Use setWebhook to set up webhook.
- Retrieve file details from updates whenever a file is uploaded.
- Use file to get the path of an uploaded file.
- Use getFile to download the file from the telegram’s server.
- Use sendPhoto to send the compressed file as a message.
For the actual image compression, we will use a free third-party API service such as tiny png. This will let us focus on the telegram-related stuff and keep our bot simple. As developers say the best way to learn is to make our hands dirty. So let’s get started, shall we?
Project Initialization and packages installation
We start by typing in the below commands to initialize our project and install all required dependencies.
npm init -ynpm install express axios dotenv tinify query-stringNext, we will create a “.env” file in the root directory of our project for all our environment variables.
TELEGRAM_TOKEN="TELEGRAM_BOT_TOKEN"
SERVER_URL="Webhook URL[in this case ngrok]"
TINIFY_API_KEY="TINIFY_API"
PORT=4000
Directory Structure
Our directory structure for this project will be something like the below. Don’t bother about the app.js file for now as we will get to it shortly.
Telegram Series - Ep 1/
┣ .env
┣ app.js
┣ package-lock.json
┗ package.json
Methods of receiving updates from telegram
Before we can interact with our bot the very first thing we will need to do is to create one using the Bot Father Bot and get an API token required to interact and manage it. You can learn to do so here.
Now, telegram’s API provides us with 2 mutually exclusive ways of receiving updates from our bot.
- Webhook: Here, telegram sends us bot updates to an URL of our choice.
- Long Polling: Here we poll the telegram API and receive updates as new updates are available.
For this tutorial, webhook will be our preferred method of receiving updates from telegram as it’s more efficient.
Set up telegram bot webhook URL
To have a webhook URL we will need to first have a running web server which we do so as below.
require('dotenv').config()
const { PORT, TELEGRAM_TOKEN, SERVER_URL } = process.env

const express = require('express')
const axios = require('axios')
const qs = require('query-string')

// TinyPng Configuration
const tinify = require('tinify')
tinify.key = TINIFY_API_KEY

const app = express()

const PORT = 4000

app.use(express.json())

app.get("/", (req, res) => {

})

app.listen(PORT, () => {
    console.log(`Server is up and running on PORT ${PORT}`)
})
Once our expressjs server is up and running, setting up a telegram bot webhook URL is the same as creating a POST route and configuring Telegram API to use it to send updates.
// Telegram API Configuration
const TELEGRAM_API = `https://api.telegram.org/bot${TELEGRAM_TOKEN}`
const URI = `/webhook/${TELEGRAM_TOKEN}`
const webhookURL = `${SERVER_URL}${URI}`

// configuring the bot via Telegram API to use our route below as webhook
const setupWebhook = async () => {
    try {
        const { data } = await axios.get(`${TELEGRAM_API}/setWebhook?url=${webhookURL}&drop_pending_updates=true`)
        console.log(data)
    } catch (error) {
        return error
    }
}

// setup our webhook url route
app.post(URL, (req, res) => {
    console.log(req.body);

    /*
      we need to respond back with 200 to let telegram know that we
      have received the update. Failing to do so will result in telegram
      not sending further updates after the first one.
    */
    res.status(200).send('ok');
})

app.listen(PORT, async () => {
    // setting up our webhook url on server spinup
    try {
        console.log(`Server is up and Running at PORT : ${PORT}`)
        await setupWebhook()
    } catch (error) {
        console.log(error.message)
    }
})
It may look like we are done with configuring Telegram API to use our webhook but we are not. If you try to run the above code it will not work. There are 2 main issues with our setup here.
- As our server is running locally, our webhook URL will be something like http://localhost:4000/webhook/{bot_token}. This is an issue as Telegram API will have no clue where to find our local server and so won’t be able to send us bot updates.
- Another issue is that even if we say have a public IP address that points to our server it won’t work unless we have HTTPS enabled. This is because Telegram expects an HTTPS URL when using the webhook mode.
When testing locally both the above issues can be solved using tools like ngrok which will expose our local server to the public internet and provide us with a public HTTPS URL.
ngrok http 4000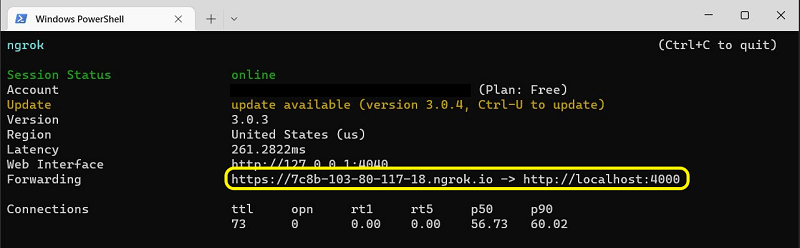
Once we have our HTTPS URL we head over to our .env file and set our SERVER_URL.
In production, our SERVER_URL will be our HTTPS-enabled server domain.
SERVER_URL="Webhook URL[in this case ngrok]"When setting our webhook there are additional parameters we can pass to the telegram API apart from the URL.
- drop_pending_updates: drop all the pending requests so that we don’t receive them over and over again.
// Telegram API Configuration
const TELEGRAM_API = `https://api.telegram.org/bot${TELEGRAM_TOKEN}`
const URI = `/webhook/${TELEGRAM_TOKEN}`
const webhookURL = `${SERVER_URL}${URI}`

// configuring the bot via Telegram API to use our route below as webhook
const setupWebhook = async () => {
    try {
        await axios.get(`${TELEGRAM_API}/setWebhook?url=${webhookURL}&drop_pending_updates=true`)
    } catch (error) {
        return error
    }
}
Test our telegram bot webhook
Let’s start our server.
node run app.jsPlease make sure you have your ngrok public URL or you won’t be able to receive bot updates.
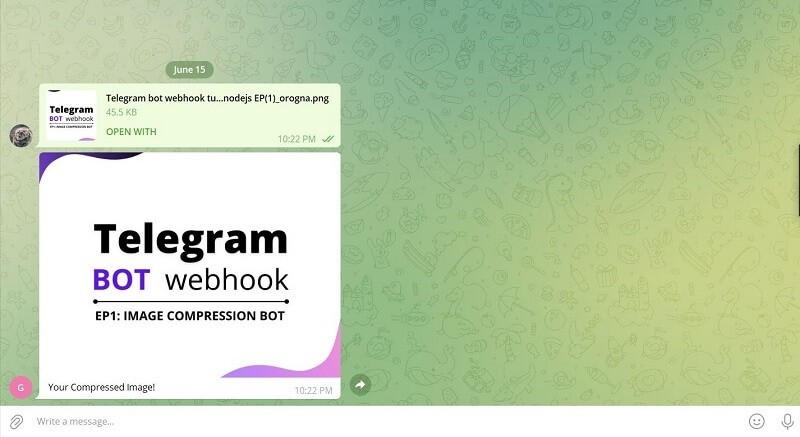
Now for testing, try sending an image to the bot via the telegram messager. On the console, you may see a JSON response like below with the file details under the document key.
{
  message_id: 35,
  from: {
    id: 1346705038,
    is_bot: false,
    first_name: 'sender's_first_name',
    username: 'username',
    language_code: 'en'
  },
  chat: {
    id: 1346705038,
    first_name: 'sender's_first_name',
    username: 'username',
    type: 'private'
  },
  date: 1653505383,
  document: {
    file_name: 'internals.JPG',
    mime_type: 'image/jpeg',
    thumb: {
      file_id: 'file_id',
      file_unique_id: 'file_unique_id',
      file_size: 15074,
      width: 202,
      height: 320
    },
    file_id: 'file_id',
    file_unique_id: 'file_unique_id',
    file_size: 25382
  }
}
compressedImageUrl
Now that we can retrieve any uploaded image via bot updates, we can use Tiny Png’s API to compress them. As you can see from the below code we are using fromBuffer method which as the name suggests takes in our image as a buffer and return an URL object pointing to our compressed image.
const compressImage = async (bufferData) => {
    try {
        const { _url } = tinify.fromBuffer(bufferData)
        return await _url
    } catch (error) {
        return error
    }
}
Process uploaded image
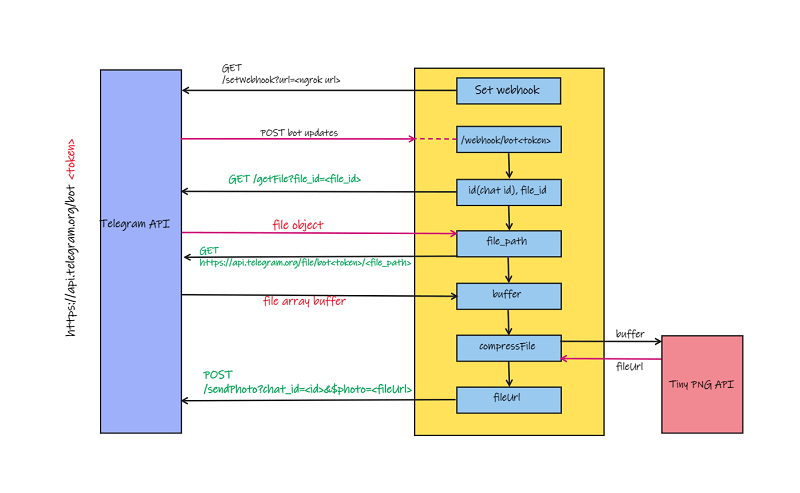
Below are the steps we follow to process updates from our telegram bot on our webhook URL for this particular tutorial.
- We retrieve the chat id and file_id from the message received via bot updates.
- Then we use the file_id to make a get request to obtain a file_path of our file.
- Then we make another get request to download the file as a buffer.
- Once we have the buffer we feed that into our compressImage function which compresses it and returns the final URL.
- In the last step, we will use the chat id from step 1 to send that image URL as a message from our bot.
app.post(URI, async (req, res) => {
    try {
        const { message: { chat: { id }, document } } = req.body

        const errorMessageQuery = qs.stringify({
            text: `Please upload an Image`
        })

        // we skip any message other than an image

        if (!((document?.file_id ?? false) && ["image/png", "image/jpeg", "image/jpg"].includes(document.mime_type))) {
            await axios.post(`${TELEGRAM_API}/sendMessage?chat_id=${id}&${errorMessageQuery}`)
            return res.status(200).send('ok')
        }

        // Fetching File ID from Telegram's Server
        const getFileOptions = {
            url: `${TELEGRAM_API}/getFile?file_id=${document.file_id}`,
            method: 'GET',
        }
        const { data: { result: { file_path } } } = await axios(getFileOptions)

        // Fetching the File from the Telegram server as buffer
        const telegramFileOptions = {
            url: `https://api.telegram.org/file/bot${TELEGRAM_TOKEN}/${file_path}`,
            method: 'GET',
            responseType: 'arraybuffer'
        }
        const { data } = await axios(telegramFileOptions)

        // Sending the compressed Image to the BOT using TinyPNG's URL
        const parsedQuery = qs.stringify({
            photo: `${await compressImage(data)}`,
            caption: `Your Compressed Image!`
        })
        const telegramSendImageOptions = {
            url: `${TELEGRAM_API}/sendPhoto?chat_id=${id}&${parsedQuery}`,
            method: "POST",
        }
        await axios(telegramSendImageOptions)

        res.status(200).send('ok')
    } catch (error) {
        console.log(error.message);
    }
})
Finished telegram bot code
require('dotenv').config()
const { PORT, TELEGRAM_TOKEN, SERVER_URL, TINIFY_API_KEY } = process.env

const express = require('express')
const axios = require('axios')
const qs = require('query-string')

// TinyPng Configuration
const tinify = require('tinify')
tinify.key = TINIFY_API_KEY

// Telegram API Configuration
const TELEGRAM_API = `https://api.telegram.org/bot${TELEGRAM_TOKEN}`
const URI = `/webhook/${TELEGRAM_TOKEN}`
const webhookURL = `${SERVER_URL}${URI}`

// app initialization
const app = express()

// middlewares
app.use(express.json())

// Returns URL from Tiny PNG after compressing the Image
const compressImage = async (bufferData) => {
    try {
        const { _url } = tinify.fromBuffer(bufferData)
        return await _url
    } catch (error) {
        return error
    }
}

// configuring the bot via Telegram API to use our route below as webhook
const setupWebhook = async () => {
    try {
        await axios.get(`${TELEGRAM_API}/setWebhook?url=${webhookURL}&drop_pending_updates=true`)
    } catch (error) {
        return error
    }
}

app.post(URI, async (req, res) => {
    try {
        const { message: { chat: { id }, document } } = req.body

        const errorMessageQuery = qs.stringify({
            text: `Please upload an Image`
        })

        if (!((document?.file_id ?? false) && ["image/png", "image/jpeg", "image/jpg"].includes(document.mime_type))) {
            await axios.post(`${TELEGRAM_API}/sendMessage?chat_id=${id}&${errorMessageQuery}`)
            return res.status(200).send('ok')
        }

        // Fetching File ID from Telegram's Server
        const getFileOptions = {
            url: `${TELEGRAM_API}/getFile?file_id=${document.file_id}`,
            method: 'GET',
        }
        const { data: { result: { file_path } } } = await axios(getFileOptions)

        // Fetching the File from the Telegram server as buffer
        const telegramFileOptions = {
            url: `https://api.telegram.org/file/bot${TELEGRAM_TOKEN}/${file_path}`,
            method: 'GET',
            responseType: 'arraybuffer'
        }
        const { data } = await axios(telegramFileOptions)

        // Sending the compressed Image to the BOT using TinyPNG's URL
        const parsedQuery = qs.stringify({
            photo: `${await compressImage(data)}`,
            caption: `Your Compressed Image!`
        })
        const telegramSendImageOptions = {
            url: `${TELEGRAM_API}/sendPhoto?chat_id=${id}&${parsedQuery}`,
            method: "POST",
        }
        await axios(telegramSendImageOptions)

        res.status(200).send('ok')
    } catch (error) {
        console.log(error.message);
    }
})

app.listen(PORT, async () => {
    try {
        console.log(`Server is up and Running at PORT : ${PORT}`)
        await setupWebhook()
    } catch (error) {
        console.log(error.message)
    }
})
Conclusion
In this short tutorial, we learned to build a simple image compression telegram bot using the webhook method and thereby familiarized ourselves with the Telegram API. Telegram API offers plenty of functionalities which we will discuss in some future tutorials with examples. I hope you like this post and in case you have any doubts or questions please feel free to leave a comment down below otherwise show us your love by sharing it with your friends and on social media.
THANK YOU!


One thought on “Telegram bot webhook tutorial in nodejs”