In this tutorial, we will be looking at how we can use integrate rabbitmq in nodejs and process tasks. Now for those who aren’t familiar with RabbitMQ, it is a message-queueing software also known as a message broker or queue manager. Simply saying, it is software where queues are defined, to which applications connect to transfer a message or messages. So let’s get started, shall we?
Register for a free cloudAMQP/rabbitmq account
Before we start integrating rabbitmq in nodejs we will need a rabbitmq server up and running. For that, we can either install it locally on our system or sign up for a free service such as cloudAMQP.
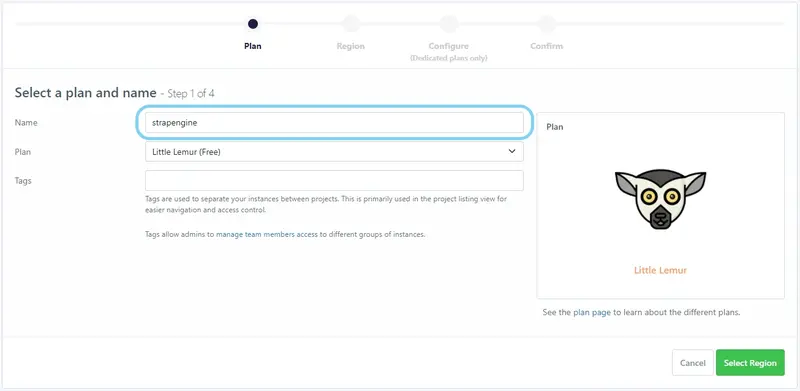
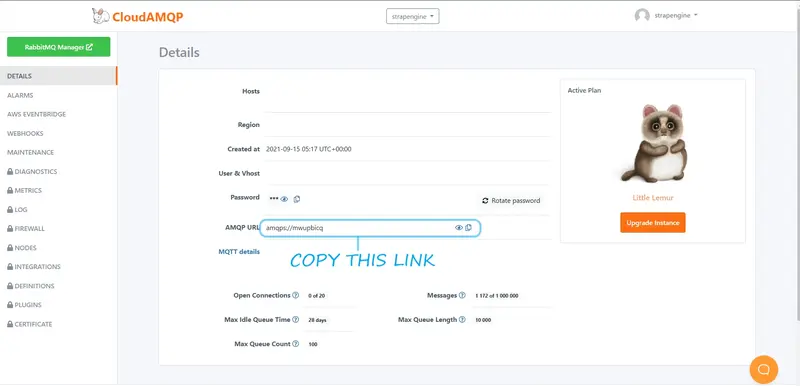
After signing up we will be redirected to create a new instance page where we have to choose a plan and region for our instance. Here we will go with Little Lemur(Free) as our plan and
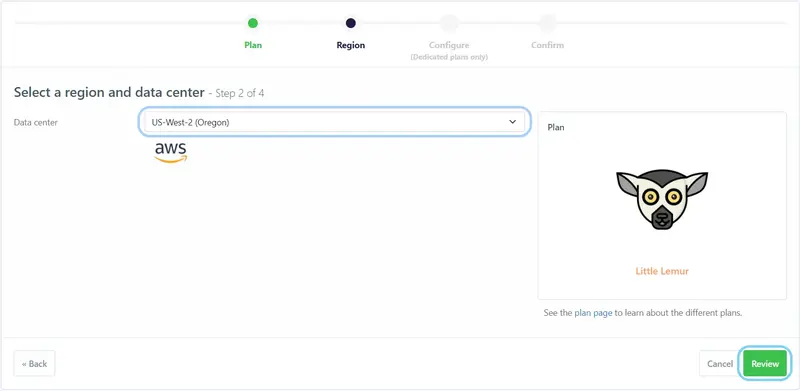
after that choose your region and click on review.
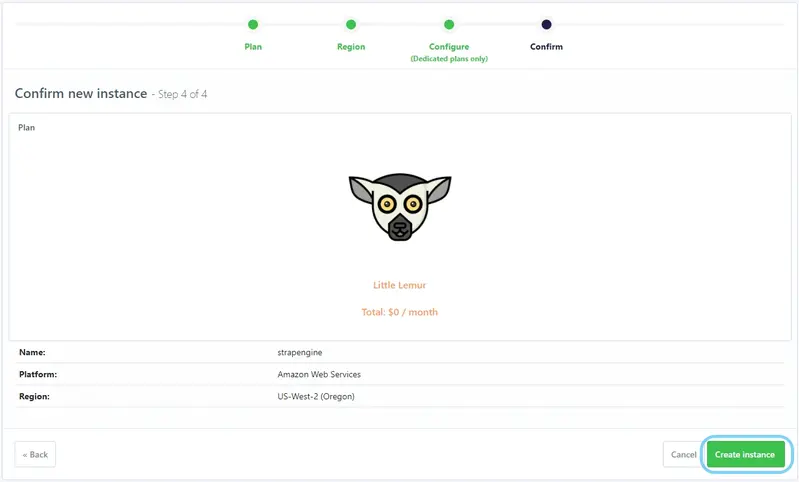
Next in the configuration tab simply click on create instance button to create our free rabbitmq instance.
Now that we have created our instance ready, we are good to go.
Note – Copy the AMQP URL and save it somewhere, we will need it later in the tutorial.
Install amqplib and other required packages
Firstly, we need to initialize our nodejs app using the command
npm init -ySecondly, we need to install some dependencies
npm install amqplib dotenv express express-fileupload lodash sharp uuidLastly, let’s create a “.env” file inside our root directory for our environment variables with the below key value.
- RABBITMQ_URL=”AMQP URL which we copied from cloudAMQP dashboard” [without quotes]
Setup our rabbitmq project directory structure
Now, let’s create an src directory within our project’s root inside which we will have four more directories namely
- queueWorkers: contains our consumer and producer files
- services: contains rabbitMQ.js class file
- uploads: will contain our uploaded image file as well generated thumbnail files
- utils: contains function.js
Connect with rabbitmq in nodejs
Now let’s have a look at how we will be connecting our nodejs application to rabbitMq. Of course, you can set up a basic connection from scratch on your own but for this tutorial, we have already prepared a rabbitMq.js class file for you. This class handles all the connection creation and other logic for you so that you can concentrate on your business logic.
Below will be the contents of our rabbitMQ.js class file.
require('dotenv').config()
const amqp = require('amqplib')
const _ = require('lodash')
class MessageBroker {
    constructor() {
        this.queues = {}
    }

    async init () {
        this.connection = await amqp.connect(process.env.RABBITMQ_URL || 'amqp://localhost')
        this.channel = await this.connection.createChannel()
        return this
    }

    async createEx ({ name, type, durable = true }) {
        if (!this.connection) await this.init()
        await this.channel.assertExchange(name, type, { durable })
        this.exchange = name
        return this
    }

    /**
     * Send message to an exchange
     * @param {Object} - object defining exchange and routingKey
     * @param {Object} msg Message as Buffer
     */
    async publish ({ ex, routingKey }, msg) {
        const queue = `${ex}.${routingKey}`
        await this.channel.assertQueue(queue, { durable: true })
        this.channel.bindQueue(queue, ex, routingKey)
        this.channel.publish(ex, routingKey, Buffer.from(msg))
    }

    /**
     * @param {Object} - object defining queue name and bindingKey
     * @param {Function} handler Handler that will be invoked with given message and acknowledge function (msg, ack)
     */
    async subscribe ({ exchange, bindingKey }, handler) {
        const queue = `${exchange}.${bindingKey}`
        if (!this.connection) {
            await this.init()
        }
        if (this.queues[queue]) {
            const existingHandler = _.find(this.queues[queue], h => h === handler)
            if (existingHandler) {
                return () => this.unsubscribe(queue, existingHandler)
            }
            this.queues[queue].push(handler)
            return () => this.unsubscribe(queue, handler)
        }

        await this.channel.assertQueue(queue, { durable: true })
        this.channel.bindQueue(queue, exchange, bindingKey)
        this.queues[queue] = [handler]
        this.channel.consume(
            queue,
            async (msg) => {
                const ack = _.once(() => this.channel.ack(msg))
                this.queues[queue].forEach(h => h(msg, ack))
            }
        )
        return () => this.unsubscribe(queue, handler)
    }

    async unsubscribe (queue, handler) {
        _.pull(this.queues[queue], handler)
    }
}

module.exports = MessageBroker
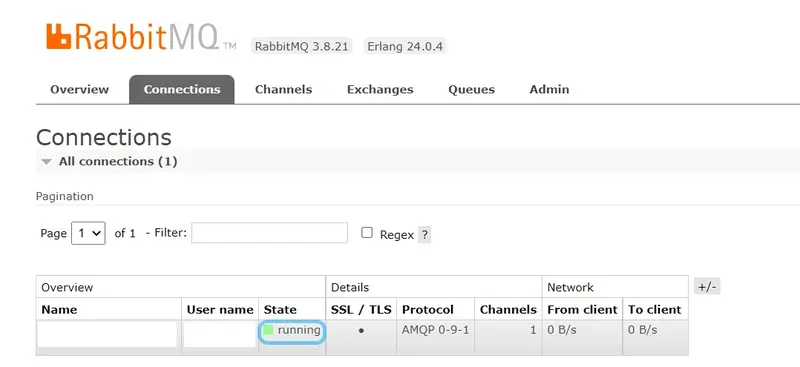
Let’s test try establishing a connection using the rabbitMQ.js class by creating a test.js file.
require("dotenv").config();
const express = require("express");
const Broker = require("./src/services/rabbitMQ");

const app = express();

app.use(async (req, res, next) => {
  try {
    const RMQProducer = await new Broker().init();
    // we now have access to rabbitMQ
    next();
  } catch (error) {
    process.exit(1);
  }
});
app.use((req, res, next) => {
  next(creatError.NotFound());
});

app.listen(process.env.PORT || 3000, () => {
  console.log("server is running", process.env.PORT || 3000);
});
As we can see our connection has been successfully established.
Create a rabbitmq producer in nodejs
Now that, we have successfully established our connection with the cloudAMQP server we can create our producer.js and consumer.js files inside our queueWorkers directory.
Before creating the producer.js file let’s understand what it will exactly do.
As the name suggests producer.js file will be creating an exchange and publishing a message to exchange(direct exchange).
In this case, we have named our exchange upload but you can name it anything you like.
Note: when we call the publish method a queue will automatically be created under the name <EXCHANGE>.<ROUTING_KEY> eg. for this case it will be upload.image
const EXCHANGE = 'upload'
module.exports = async (instance, { message, routingKey }) => {
    try {
        await instance.createEx({
            name: EXCHANGE,
            type: 'direct'
        })
        await instance.publish({ ex: EXCHANGE, routingKey }, message)
        return Promise.resolve()
    } catch (error) {
        return Promise.reject(error)
    }
}
Create a rabbitmq consumer in nodejs
Now that we have successfully created our producer we have to create our consumer.js file.
Firstly, let’s understand what consumer.js does.
Well, the consumer.js file is responsible for consuming the message published by the producer and processing it accordingly via a handler(in this case our process is resizing our uploaded image)
In this case, our handler will be handleImage which upon receiving a message resize images from the uploads/original directory and saves the resized image into the thumbnail directory inside our uploads directory.
Following is the code logic for the handleImage function. Here we are using the sharp package for image resizing.
const handleImage = async (payload, ack) => {
  try {
    const fileName = payload.content.toString();
    const fileUrl = `./src/uploads/original/${fileName}`;

    // we first need to make sure if the file exist and is readable
    const exists = await fileExists(fileUrl);

    if (!exists) {
      ack();
      throw new Error(`ERR:FILE ${fileUrl} not readable`);
    }
    // we create a read stream
    const readStream = fs.createReadStream(fileUrl);

    let transform = sharp();

    const [width, height] = [400, 300];

    // we resize the image
    transform = transform.resize(width || 400, height || 300);

    // we pipe our readstream to a writestream
    pipeline(
      readStream.pipe(transform),
      fs.createWriteStream(`./src/uploads/thumbnail/${fileName}`)
    );
    // we acknowledge the delivery
    ack();
  } catch (error) {
    console.error(error);
  }
};
After plugging in our handler below will be the complete logic for the consumer.js file.
const fs = require("fs");
const sharp = require("sharp");
const { promisify } = require("util");

const Broker = require("../services/rabbitMQ");

const { fileExists } = require("../utils/functions");

const RMQConsumer = new Broker().init();
const pipeline = promisify(require("stream").pipeline);
const EXCHANGE = "upload";

/**
 * Process 1:1 message and stores in db, also processes group messages 1 by 1
 * @param {String} payload - message in json string format
 * @param {Function} ack - callback function
 */
const handleImage = async (payload, ack) => {
  try {
    const fileName = payload.content.toString();
    const fileUrl = `./src/uploads/original/${fileName}`;

    // we first need to make sure if the file exist and is readable
    const exists = await fileExists(fileUrl);

    if (!exists) {
      ack();
      throw new Error(`ERR:FILE ${fileUrl} not readable`);
    }
    // we create a read stream
    const readStream = fs.createReadStream(fileUrl);

    let transform = sharp();

    const [width, height] = [400, 300];

    // we resize the image
    transform = transform.resize(width || 400, height || 300);

    // we pipe our readstream to a writestream
    pipeline(
      readStream.pipe(transform),
      fs.createWriteStream(`./src/uploads/thumbnail/${fileName}`)
    );
    // we acknowledge the delivery
    ack();
  } catch (error) {
    console.error(error);
  }
};

async function processUploads() {
  try {
    const consumer = await RMQConsumer;
    await consumer.createEx({
      name: EXCHANGE,
      type: "direct",
    });
    consumer.subscribe(
      { exchange: "upload", bindingKey: "image" },
      handleImage
    );
  } catch (error) {
    console.log(error);
  }
}

processUploads();

// close channek, connection on exit
process.on("exit", (code) => {
  RMQConsumer.channel.close();
  RMQConsumer.connection.close();
});
Create a basic fileExist utility function
As from the previous step we can see that we are using a fileExists method to check if a fileExists on our system before we can start processing it. Inside our utils directory let’s create a function.js file in which we will be defining our fileExists function
So here is the code logic for our function.js file.
const fs = require('fs')

exports.fileExists = (path, flag = 1) => {
    return new Promise(function (resolve, reject) {
        let accessConst = null
        if (flag === 2) accessConst = fs.constants.W_OK
        else accessConst = fs.constants.R_OK
        fs.access(path, accessConst, (err) => {
            if (err) {
                if (err.code === 'ENOENT') resolve(false)
                else reject(err)
            } else resolve(true)
        })
    })
}
At last, we have to create our “app.js” file which will hold all the code logic for our express server.
Inside the app.js file, we have a saveImage function responsible for uploading a file to the uploads/original directory.
Note: We have already discussed basic file upload in nodejs which you can check out here.
Here is the code logic for the saveImage function
const saveImage = (data) => {
  const writeFile = promisify(fs.writeFile)
  return new Promise((resolve, reject) => {
    if (!data) {
      reject("File not available!");
    }
    try {
      const fileName = `img_${uuid()}.jpg`;

      writeFile(`./src/uploads/original/${fileName}`, data);

      resolve(fileName);
    } catch (error) {}
  });
};
So here is the final code logic for the app.js file.
require("dotenv").config();
const express = require("express");
const Broker = require("./services/rabbitMQ");
const fileUpload = require("express-fileupload");
const publishToExchange = require("./queueWorkers/producer");
const { v4: uuid } = require("uuid");
const fs = require("fs");
const {promisify} = require("util")

const app = express();
app.use(fileUpload());
const RMQProducer = new Broker().init();

app.use(async (req, res, next) => {
  try {
    req.RMQProducer = await RMQProducer;
    next();
  } catch (error) {
    process.exit(1);
  }
});

const saveImage= (data) => {
  const writeFile = promisify(fs.writeFile)
  return new Promise((resolve, reject) => {
    if (!data) {
      reject("File not available!");
    }
    try {
      const fileName = `img_${uuid()}.jpg`;

      writeFile(`./src/uploads/original/${fileName}`, data);

      resolve(fileName);
    } catch (error) {}
  });
};

// your routes here
app.post("/upload", async (req, res) => {
  const { data } = req.files.image;
  try {
    const message = await saveImage(data)
    await publishToExchange(req.RMQProducer, {
      message,
      routingKey: "image",
    });
    res.status(200).send("File uploaded successfuly!")
  } catch (error) {
    res.status(400).send(`File not uploaded!`)
  }
});

app.use((req, res, next) => {
  next(creatError.NotFound());
});

// error handling
app.use((err, req, res, next) => {
  res.status(err.status || 500).send({
    error: {
      status: err.status || 500,
      message: err.message,
    },
  });
});
app.listen(process.env.PORT || 3000, () => {
  console.log("server is running", process.env.PORT || 3000);
});

process.on("SIGINT", async () => {
  process.exit(1);
});
process.on("exit", (code) => {
  RMQProducer.channel.close();
  RMQProducer.connection.close();
});
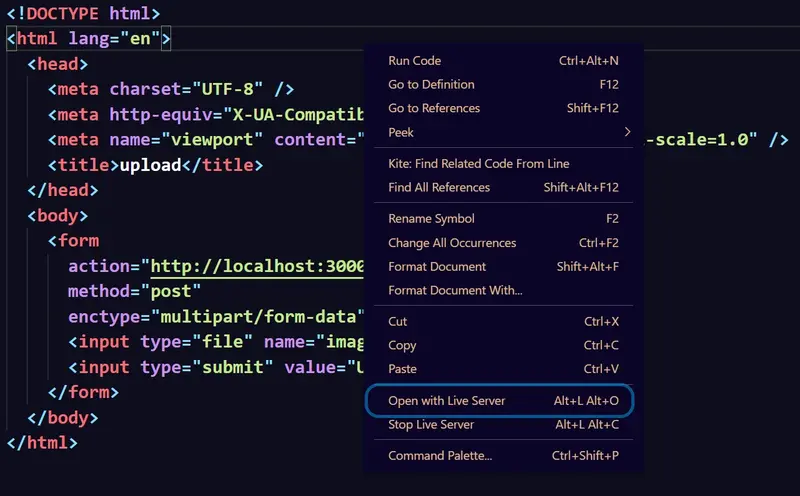
Now, let’s create a basic frontend to test our app by creating an index.html file.
<!DOCTYPE html>
<html lang="en">
  <head>
    <meta charset="UTF-8" />
    <meta http-equiv="X-UA-Compatible" content="IE=edge" />
    <meta name="viewport" content="width=device-width, initial-scale=1.0" />
    <title>upload</title>
  </head>
  <body>
    <form
      action="http://localhost:3000/upload"
      method="post"
      enctype="multipart/form-data">
      <input type="file" name="image" required />
      <input type="submit" value="Upload" />
    </form>
  </body>
</html>
Test our rabbitmq integration in nodejs
Now that we are done with all the coding parts we need to test our application.
Firstly, start the server as well as the consumer
node ./src/app.jsnode ./src/queueWorkers/consumer.jsSecondly, open index.html with the live server
Thirdly, choose an image to upload.

Lastly, click on upload to upload the image.

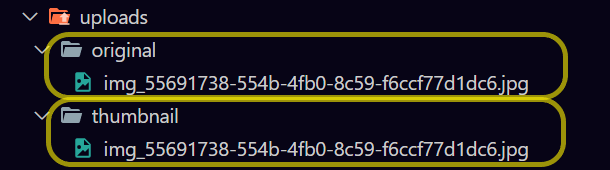
Results
Now that, we have successfully uploaded our images we will get both images inside our respective directories.
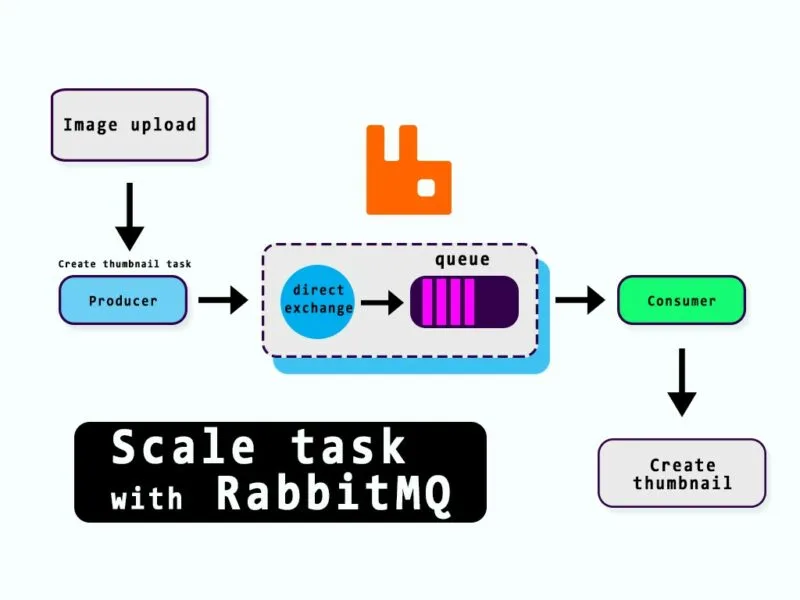
How can this be scaled?
Well looking at the project one can easily see that say if we have a producer producing a lot of tasks we can easily start multiple consumers processing the image resizing task in parallel. Also, we can push tasks from multiple producers too.
Conclusion
Finally, we are done. We went through a step-by-step guide to using rabbitmq in your nodejs project. We tried keeping the example for this tutorial simple, yet close to one of the scenarios where we can use rabbitmq. If you have any doubts or questions please feel free to leave a comment down below. Show us your love by sharing it with your friends and on social media.
If you are done you can check out this tutorial too where we have dockerize the above example.
Thank you for reading.


This is likely the best Rabbit MQ code example I’ve seen. Not too noob-ish, not too advanced. I had to go through my history for about 20 mins to find this article. Thank you.
Welcome 🙂 I am glad you liked our article.
Good Article, Thank You Anon!
We are glad you liked our article.