
In this tutorial, we will be implementing file upload via drag and drop in our frontend using the FilePond library. For those unfamiliar with FilePond, it is a JavaScript library that brings silky smooth drag n’ drop functionality to our frontend without having to deal with all the complexities. So let’s get started, shall we?
Before we start discussing our code’s logic let’s understand how our application will work.
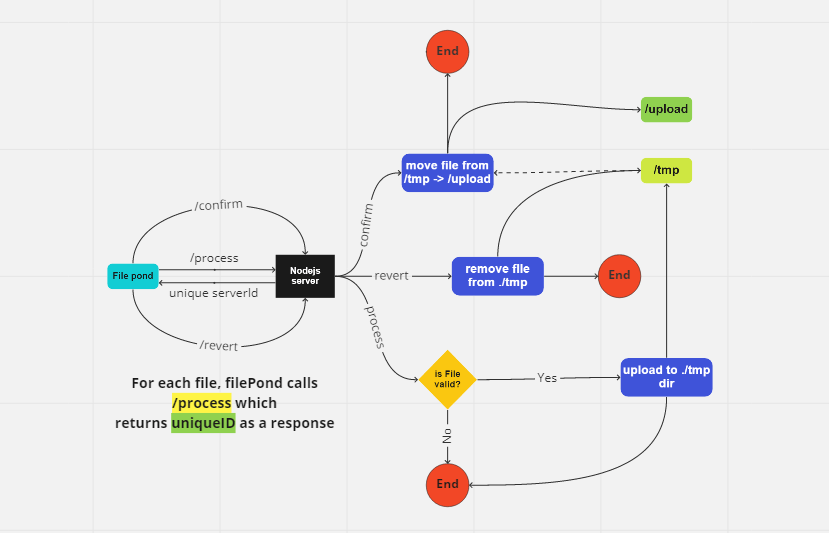
The whole process starts with a user selecting files using the FilePond’s upload dialog. Doing so will trigger FilePond to start uploading each file to our backend one at a time. Upon receiving the files in our backend will we move them to a temporary directory to be handled later on and return the unique IDs(to be identified later on) associated with our files as a response.
Once the user confirms the file upload by clicking on a confirm button we will send another request along with the unique IDs(automatically available in FilePond’s file object) to our backend to move the file from “tmp” directory to an “upload directory” thus confirming the upload process.
Setup drag and drop file upload frontend
Let’s set up the front-end of our project which will only consist of 2 files.
- index.html – contains our app layout with filepond.
- script.js – contains all the frontend logic for our app.
index.html
<!DOCTYPE html>
<html lang="en">
  <head>
    <meta charset="UTF-8" />
    <meta http-equiv="X-UA-Compatible" content="IE=edge" />
    <meta name="viewport" content="width=device-width, initial-scale=1.0" />
    <title>File Pond</title>
    <link
      href="https://unpkg.com/filepond/dist/filepond.css"
      rel="stylesheet"
    />
  </head>
  <body>
    <input type="file" id="my-pond" name="filepond" />
    <button id="submit">Submit</button>
    <!-- include jQuery library -->
    <script src="https://cdnjs.cloudflare.com/ajax/libs/jquery/3.3.1/jquery.js"></script>

    <!-- include FilePond library -->
    <script src="https://unpkg.com/filepond/dist/filepond.min.js"></script>


    <!-- include FilePond jQuery adapter -->
    <script src="https://unpkg.com/jquery-filepond/filepond.jquery.js"></script>

    <!-- Include axios -->
    <script src="https://cdnjs.cloudflare.com/ajax/libs/axios/0.24.0/axios.min.js"></script>

    <script src="./script.js"></script>
  </body>
</html>
Inside our body, we have
- input[name=’filepond’] – will hold all the chosen files.
- button(#submit) – will send the files to server.
and below our body, we have included 5 scripts
- jquery.js – allow app to use the features of JQuery.
- filepond.js – allow app to use the features of Filepond.
- filepond.jquery.js – Filepond’s JQuery integration.
- axios.js – to send requests to our server.
- script.js – holds all the logic for our application.
Below is the structure of script.js
$document.ready(function () {

  // create the filepond instance
  $("input[name='filepond']").filepond({

  });

  // set options to intereact with server
  $("input[name='filepond']").filepond.setOptions({

  });

  // submit the files to the server
  $("#submit").on("click", async () => {

  });

});
First of all, we have initialized a Filepond instance with our required properties.
 $("input[name='filepond']").filepond({
    allowMultiple: true,
    storeAsFile: true,
    forceRevert: true,
    credits: false,
  });
After that, we have to configure file-pond by providing a configuration-options object. For example in our case, we only need to set the properties related to the server in the options object.
- url – root url of our server
- process – path where our file starts uploading the file on drag and drop.
- revert – path to delete the file from tmp directory if we don’t want to upload it.
  // set options to intereact with server
  $("input[name='filepond']").filepond.setOptions({
    server: {
      url: "http://localhost:3000",
      process: {
        url: "/process",
      },

      revert: async (uniqueId, load) => {
        try {
          await axios({
            url: "http://localhost:3000/revert",
            method: "DELETE",
            headers: { uniqueId },
          });
        } catch (error) {
          return error;
        }
      },
    },
  });
Last but not the least, we have a submit button, clicking which will send the “unique ids” back to the server using which we will move the file from the “tmp” directory to the “upload” directory.
$("#submit").on("click", async () => {
    try {
      let data = [];
      const files = $("input[name='filepond']");
      for (let i = 0; i < files.length; i++) {
        data.push(files[i].value);
      }
      await axios({
        url: "http://localhost:3000/confirm",
        method: "POST",
        data,
      });
    } catch (error) {
      return error;
    }
  });
Initialize our backend
For that, open the terminal in a new directory and run the command:
npm init -ynpm install express busboy cors uuidUnderstand directory structure
Inside our root directory, we’ll have 2 directories namely
tmp– for storing our files temporarily and
upload – for storing our files permanently
Setup our express server
Now that we are ready with our directories, we are good to create our app.js file that will hold all the code logic for our server.
app.js
const port = process.env.PORT || 3000;
const express = require("express");
const cors = require("cors");
const { json } = require("express");
const busboy = require("busboy");
const fs = require("fs");
const { promises: Fs } = require("fs");
const { v4: uuidv4 } = require("uuid");
const path = require("path");


const app = express();
app.use(cors());
app.use(json());

const save = (req, res) => {

   // Saves uploaded file to "temp" directory.
};

const tempRemove = (req, res) => {

   // Removes file from "temp" directory if exists.
};

const confirm = (req, res) => {

   // Moves file from "temp" directory to "upload" directory.
};

// Routes.
app.post("/process", save);

app.delete("/revert", tempRemove);

app.post("/confirm", upload);


app.listen(port, () => console.log(`Server is up and running on port ${port}`));
save()
This function is responsible for saving the file to the “tmp” directory and returning the unique Id to Filepond.
const save = (req, res) => {
  const bb = busboy({ headers: req.headers });
  req.pipe(bb);
  try {
    bb.on("file", (fieldName, file, info) => {
      const uuid = `${uuidv4()}`;
      file.pipe(fs.WriteStream(`${path.join(__dirname)}/tmp/${uuid}`));
      res.send(uuid);
    });
  } catch (error) {
    res.send(error.message);
  }
};
tempRemove()
This function is responsible for removing the file from the “tmp” directory upon revert.
const tempRemove = async (req, res) => {
  var { uniqueid } = req.headers;
  const filePath = `${path.join(__dirname)}/tmp/${uniqueid}`;
  try {
    await Fs.unlink(filePath);
    res.send({ status: 200, message: `File removed!` });
  } catch (error) {
    res.send({ message: error.message });
  }
};
confirm()
This function is responsible for moving the files from our “tmp” directory to our “upload” directory.
const confirm = async (req, res) => {
  const files = req.body;
  const tempPath = path.join(__dirname, "/tmp/");
  const uploadPath = path.join(__dirname, "/upload/");
  const renamePromises = [];
  try {
    files.forEach((file) =>
      renamePromises.push(
        Fs.rename(`${tempPath}/${file}`, `${uploadPath}${file}.png`)
      )
    );
    if (renamePromises.length > 0) await Promise.all(renamePromises);
    res.send({ status: 200, message: `File uploaded successfully` });
  } catch (err) {
    res.send(err.message);
  }
};
Routes
Next is to set up our corresponding routes.
/process
app.post("/process", save);/revert
app.delete("/revert", tempRemove);/confirm
app.post("/confirm", confirm);Testing
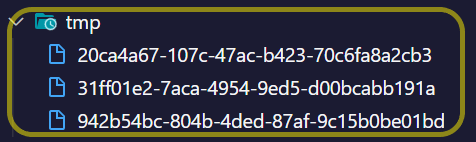
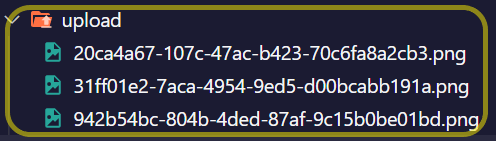
We choose the files to upload

and we have the files saved in the tmp folder
which upon confirmation gets moved to our destination directory.
Things that can be improved
- tempRemove – in production we actually push the files(uniqueID) to be removed to a queue(durable) to be processed by a separate worker/consumer. This is because things can fail unexpectedly and to ensure that we can recover from such a failure and don’t end up with unwanted files in our server. Also, this approach is better than setting up a CRON job.
- confirm – here too we should move the ids of the files to a queue and let a separate worker handle the operations.
Conclusion
Walah! we have successfully used Filepond to drag and drop file upload to our server. If you find this post useful please feel free to appreciate it in the comments. Also, if you have any queries don’t forget to raise them in the comment section.
THANK YOU!