
In this tutorial, we will be looking at some of the nodejs API best practices that we should be keeping in mind while building our Nodejs REST API.
Our main focus in this post will be to make our API secure, scalable, and optimized.
So let’s get started, shall we?
Handle errors gracefully
One of the first and foremost nodejs API best practices is handling abnormal/unexpected user inputs. For example, if a user with invalid credentials tries to access our API then our API should respond to them with a status code 401 and a message “Unauthorized“.
Whereas if the user has valid credentials but doesn’t lack sufficient permissions then we should respond with 403(Forbidden)
Similarly, here are some of the standard status codes along with error messages
- 400 Bad Request – When user input params doesn’t match with what our API is expecting.
- 404 Not Found – Users tries to access a path that doesn’t exists.
Although we can take care of most of the user-generated errors our API might still have some internal errors which can be due to syntax or our own code’s logic.
So we must implement a Global Exception handler that will handle any unanticipated runtime errors and respond with status code 500(Internal Server Error).
const express = require("express");

const app = express();

const port = process.env.PORT || 3000;


app.use((err, req, res, next) => {
  res.status(err.status || 500).send({
    status: err.status || 500,
    message: err.message,
  });
});

app.listen(port, () => console.log(`Server is up and running on port ${port}`));
Use rate limiting in your api
Rate limiting is a technique a developer employs to limit the number of requests to API during a time window.
Sometimes it may happen a user may intentionally or unintentionally bombard our server with a large number of requests in a relatively short period. Doing so will clog down our API server and make it unresponsive and unavailable for other users.
To get around this problem we can simply use a Rate Limiter and respond with a message like Limit Reached.
In express, we can simply use a package express-rate-limiter with some basic configurations. There are more advanced options available but are out of the scope of this tutorial.
npm install express-rate-limiterconst express = require("express");
const rateLimit = require("express-rate-limit");
const app = express();
const port = process.env.PORT || 3000;
const limiter = rateLimit({
windowMs: 15 * 60 * 1000, // 15 minutes
max: 1000, // 1000 requests
});
app.use(limiter);
app.listen(port,()=>console.log(`Server is up and running on PORT : ${port}`));
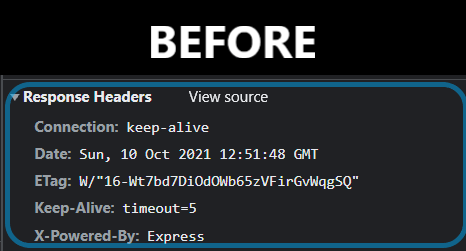
Protect HTTP Headers
HTTP headers are key-value pairs that transfer data between the web server and a client. While being very useful but may leak out sensitive information like server version, proxy used, etc. Therefore, securing our request headers is also one of the important aspects to be taken care of.
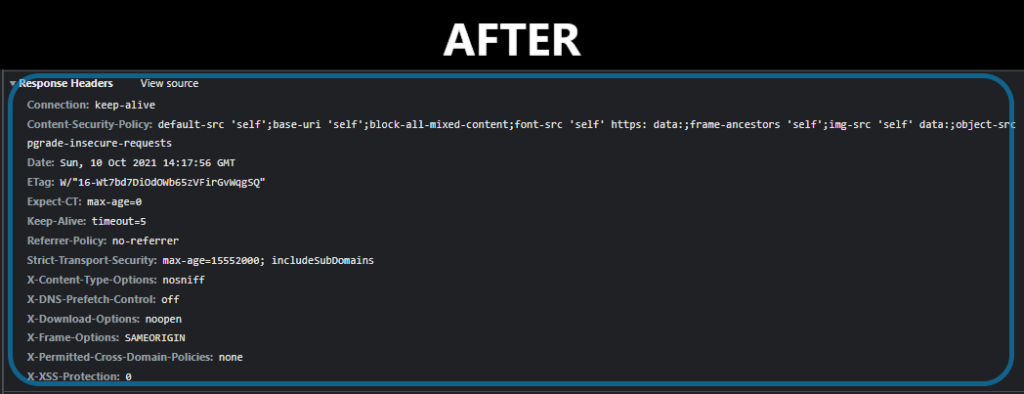
For this tutorial, we will use a Helmet that takes care of the header’s information without much configuration.
npm install helmetconst express = require("express");
const helmet = require("helmet");
const app = express();
const port = process.env.PORT || 3000;
app.use(helmet());
app.listen(port, () => console.log(`Server is up and running on port ${port}`));
Cache data to improve performance
Caching is one of the most important but less implemented nodejs API best practices that store a copy of frequently used data along with a request-response path.
Let’s suppose where we have a CPU and IO intensive endpoint in our API. Now every time user hits this endpoint our code needs to do all the CPU/IO operations to deliver a response. This is well and good for dynamic responses but, can negatively affect our API where our response doesn’t change much with time. This will not only increases the redundancy but can also reduce the performance of our API. What we can do is cache less frequently changing API responses.
Do note that we should only use Caching where the result of an operation doesn’t change frequently with time. Otherwise, it will create a bad experience for our API users since they will get stall responses.
There are many caching solutions available out there like Redis, in-memory-caching, etc each with its advantages/disadvantages. For this example, we will be using apicache middleware in our app as it’s easy to use with express without much configuration needed.
npm i apicacheconst express = require("express");
const apiCache = require("apicache")
const cache = apiCache.middleware
const app = express();
const port = process.env.PORT || 3000;
app.use(cache("5minutes"));
// Data from Database
const users = [
{
firstName: "John",
lastName: "Doe",
email: "[email protected]",
age: 25,
},
{
firstName: "Dane",
lastName: "Mark",
email: "[email protected]",
age: 28,
},
{
firstName: "Angila",
lastName: "Kaprio",
email: "[email protected]",
age: 23,
},
];
app.get("/users", (req, res) => {
res.status(200).json(users);
});
app.listen(port, () => console.log(`Server is up and running on port ${port}`));

Use reverse proxy in front of your api
A reverse proxy is a proxy server that retrieves resources on behalf of the client from one or more servers. It not only retrieves resources but can also act as a load balancer to distribute requests between different API servers. Apart from that, it provides a layer of security as a client cannot access our API directly.
Although we can use a popular reverse proxy web server like NGINX, HA proxy but in this case, we will be using http-proxy-middleware to create our proxy server.
npm i http-proxy-middlewareconst express = require("express");
const { createProxyMiddleware } = require("http-proxy-middleware");
// Create Express Server
const app = express();
// Configuration
const PORT = 3000;
const HOST = "localhost";
const URL_OF_PROXY_SERVER= "localhost:3001";
// Data from database
const users = [
{
firstName: "John",
lastName: "Doe",
email: "[email protected]",
age: 25,
},
{
firstName: "Dane",
lastName: "Mark",
email: "[email protected]",
age: 28,
},
{
firstName: "Angila",
lastName: "Kaprio",
email: "[email protected]",
age: 23,
},
];
// Info GET endpoint
app.get("/users", (req, res, next) => {
res.status(200).send(JSON.stringify(users));
});
// Proxy endpoints
app.use(
"/json_placeholder",
createProxyMiddleware({
target:URL_OF_PROXY_SERVER,
changeOrigin: true,
pathRewrite: {
[`^/json_placeholder`]: "",
},
})
);
app.listen(PORT, HOST, () => {
console.log(`Starting Proxy at ${HOST}:${PORT}`);
});
Set timeout for external http calls
Responding to the client within a specific timeframe is also an important aspect of API development. In this ever-connected world, building an API not connected to third-party API services is hard.
Sometimes those third-party services on which our API relies may take a long time to respond or may not respond at all for a short period. In that case, our API clients will have to keep waiting for a long time before a response timeout, which is a bad user experience.
To avoid such a scenario we can implement some sort of HTTP timeout within which if a third party API doesn’t respond we can terminate the request and provide a corresponding response to our client.
const express = require("express");

const app = express();


const PORT = 3000;

// Setting up the Timeout of 2000/100 = 20seconds
app.use(function (req, res, next) {
  req.setTimeout(2000, () => {
    res.status(408).send("Request timed out");
  });
  next();
});

// Data from database
const users = [
  {
    firstName: "John",
    lastName: "Doe",
    email: "[email protected]",
    age: 25,
  },
  {
    firstName: "Dane",
    lastName: "Mark",
    email: "[email protected]",
    age: 28,
  },
  {
    firstName: "Angila",
    lastName: "Kaprio",
    email: "[email protected]",
    age: 23,
  },
];

// users GET endpoint
app.get("/users", (req, res, next) => {
  res.status(200).json(users);
});

app.listen(PORT, () => {
  console.log(`Starting server at ${PORT}`);
});
Use request body limiter
Another way to exhaust our API resources is by sending a huge payload and exhaust system memory. To mitigate this we should always set a max size on the payload accepted in the body of a request.
npm install express express-fileupload const express = require("express");
const app = express();
const fileUpload = require("express-fileupload");
const PORT = 3000;
app.use(
fileUpload({
limits: {
// 10 bytes * 1024 = 1Kb
fileSize: 10 * 1024,
},
abortOnLimit: true,
})
);
app.post("/upload", (req, res, next) => {
res.send("Hello");
});
app.listen(PORT, () => {
console.log(`Starting server at ${PORT}`);
});

Avoid synchronous code and queue long running processes
One of the last but not the least nodejs API best practices is avoiding synchronous code. As you may have already heard that nodejs is single-thread. That simply means that nodejs can only handle/process one task at a time. So it’s always advisable to not write code that blocks the main thread.
const express = require("express");
const sleep = require("atomic-sleep");
const app = express();
const port = process.env.PORT || 3000;

app.get("/", (req, res) => {
  sleep(10000);
  res.send("Hello from syncronous code");
});
app.listen(port, () =>
  console.log(`Server is up and running on PORT : ${port}`)
);

Why you may ask? It’s because if we have some blocking(long-running synchronous) code in our API logic, while our API is processing the current task/request it won’t be able to accept any other requests from any other user.
To get around this problem always try to
- avoid CPU-intensive tasks in nodejs.
- modify synchronous IO operations to work asynchronously.
But if you do require to run long-running processing use a queue like rabbitmq to queue tasks and process them independently rather than keeping the user waiting. This approach is scalable too. If you have used a queue before in nodejs checkout out this article.
const express = require("express");
const app = express();

const port = process.env.PORT || 3000;

const func1 = async function () {
  return new Promise((resolve) => {
    setTimeout(() => {
      resolve("Successfully resolved!");
    }, 2000);
  });
};

app.get("/", async (req, res) => {
  const info = await func1();
  res.send(info);
});

app.listen(port, () =>
  console.log(`Server is up and running on PORT : ${port}`)
);

Are there other nodejs api best practices?
Apart from the ones discussed above, there are others too but for the sake of this tutorial, we have limited this to the most important and frequently used ones.
Conclusion
Walah! we have implemented some of the most important aspects which we should be practising while building our nodejs REST API. I hope this post might help you to create your API more secure, scalable, and optimized. If you liked this post feel free to appreciate it in the comments. Also, if you have any queries or suggestions don’t forget to mention those in the comment section.
THANK YOU!


One thought on “Nodejs API best practices”