
In this tutorial, we will be looking at how to add JWT authentication in a nodejs application. By definition, JSON Web Tokens are an open, industry-standard RFC 7519 method for representing claims securely between two parties.
So let’s not waste any more time and get started.
Agenda
The agenda for this tutorial will be to create a basic register/login API and use JWT authentication to protect/guard specific routes in our nodejs API. And for that, we will be creating 3 routes register, login, and get a user.
Initialize our project and install dependencies
First of all, let’s create a new folder and open a terminal in our favourite code editor
npm init -ynpm install express dotenv http-errors jsonwebtoken lodash simple-json-db uuidSet environment variables
After that let’s create a “.env” file inside our project’s root directory and paste the below values as per your choice
JWT_ACCESS_TOKEN_SECRET=”YOUR_SECRET_OF_YOUR_CHOICE”
JWT_EXPIRY=”EXPRY_TIME_ACCORDINGLY”
JSON_DB_PATH=./db.json
# this secret will be used to create our token, must be strong enough
JWT_ACCESS_TOKEN_SECRET=kjh7jg6$hgjh
# time after which our token will expire, 1m is 1 minute.
JWT_EXPIRY=1m
# path for our json database(dummy database)
JSON_DB_PATH=./db.json
Setup directory structure
Now we have created 4 directories for different purposes.
JWT/
┣ controllers/
┃ ┣ auth.js
┃ ┗ user.js
┣ middlewares/
┃ ┗ auth.js
┣ routes/
┃ ┣ auth.js
┃ ┗ user.js
┣ utils/
┃ ┗ jwt.js
┣ .dccache
┣ .env
┣ app.js
┣ bun.lockb
┣ db.json
┣ package-lock.json
┣ package.json
┗ rest.http
Create our app’s entry file
Now that we are ready with the directories, we are good to go.
Firstly, create an app.js file inside our root directory.
This will be our app’s entry file. As we can see we have imported some routes which we will see later in the tutorial. But first, copy-paste the below code into our app.js
require('dotenv').config()
const express = require('express')

const app = express()

const authRoutes = require('./routes/auth')
const userRoutes = require('./routes/user')

// middlewares

app.use(express.json())

app.use('/', authRoutes)
app.use('/user', userRoutes)

// error handling
app.use((err, req, res, next) => {
  res.status(err.status || 500).send({
    error: {
      status: err.status || 500,
      message: err.message
    }
  })
})
app.listen(process.env.PORT || 3000, () => {
  console.log('server is running', process.env.PORT || 3000)
})

process.on('SIGINT', async () => {
  process.exit(1)
})
Create our controllers
After that, we will be creating our controllers.
Inside our controller directory, we will be creating 2 controller files auth.js and user.js
auth.js: which contains logic for our register and login functionality.
const { v4: uuid } = require('uuid')
const creatError = require('http-errors')
const JSONdb = require('simple-json-db')
const db = new JSONdb(process.env.JSON_DB_PATH, { asyncWrite: true })
const { signJwtToken } = require('../utils/jwt')
/**
 * Access token delivery handler
 */
const tokenHandler = async (user) => {
  try {
    // generate token
    const accessToken = await signJwtToken(user, {
      secret: process.env.JWT_ACCESS_TOKEN_SECRET,
      expiresIn: process.env.JWT_EXPIRY
    })
    return Promise.resolve(accessToken)
  } catch (error) {
    return Promise.reject(error)
  }
}

// handles register
exports.register = async (req, res, next) => {
  try {
    const { email, password } = req.body
    // this is just a demo code and not for production
    db.set(email, JSON.stringify({ id: uuid(), username: `Demo username ${uuid()}`, password }))
    res.status(201)
    res.send('Account created successfully')
  } catch (error) {
    next(error)
  }
}

// handles login
exports.login = async (req, res, next) => {
  try {
    const { email, password } = req.body

    const userData = db.get(email)

    if (!userData) throw creatError.NotFound()

    const { id, username, password: dbPassword } = JSON.parse(userData)

    if (!(id && (password === dbPassword))) throw creatError.Unauthorized()

    const token = await tokenHandler({ id, username, email })
    res.send(token)
  } catch (error) {
    next(error)
  }
}
Remember we are storing the user registration data in a JSON database and so we will also need some way to retrieve it. So let’s create our user.js controller file.
user.js: contains logic for retrieving users from our JSON database.
const creatError = require('http-errors')
const JSONdb = require('simple-json-db')
const db = new JSONdb(process.env.JSON_DB_PATH, { asyncWrite: true })
exports.getUser = async (req, res, next) => {
  try {
    // checking for any error occurance
    const { email } = req.payload
    if (!email) throw creatError.Unauthorized()

    const userData = db.get(email)

    if (!userData) throw creatError.NotFound()

    // creating user as json
    const userDataObj = JSON.parse(userData)

    // remove the password key before sending it to client
    delete userDataObj.password

    res.status(200).send(userDataObj)
  } catch (error) {
    next(error)
  }
}
Create utilities required for JWT authentication in nodejs
Once we are done with our controllers we need to create a jwt.js file inside our utils directory which will hold the functionality of signing and verifying our JWT tokens.
const jwt = require('jsonwebtoken')
const creatError = require('http-errors')
module.exports = {
  signJwtToken: (data, { secret, expiresIn }) => {
    return new Promise((resolve, reject) => {

      // options also takes in algorithm (default: HS256)
      // Another algorithm we can use is RS256 which require a pair of pvt/pub key
      const options = {
        expiresIn,
        algorithm: 'HS256'
      }

      jwt.sign(data, secret, options, (err, token) => {
        if (err) return reject(creatError.InternalServerError())
        resolve(token)
      })
    })
  },
  // verify tokens
  verifyJwtToken: ({ token, secret }) => {
    return new Promise((resolve, reject) => {

      jwt.verify(token, secret, { algorithms: ["HS256"] }, (err, payload) => {
        if (err) {
          const message = err.name === 'TokenExpiredError' ? err.message : 'Unauthorized'
          return reject(creatError.NotAcceptable(message))
        }
        resolve(payload)
      })
    })
  }
}
When using jwt.sign method the default algorithm in options is HS256 if one is not provided. This is important from a security perspective because when using jwt.verify we also need to pass in the same algorithm(HS256 in this case) as an array.
Note: Please make sure to only ever have 1 algorithm in the array passed under options in jwt.verify to prevent Algorithm confusion attacks
Create middlewares
Next, we need a middleware that will check if the user requesting a protected route has a valid JWT token.
So let’s create a file named auth.js in our middleware directory and within that, we will have a function named accessTokenValidator which as the name suggests checks for token validity and return an error in case the token is not a valid one.
require('dotenv').config()

const _getKeyValue = require('lodash/get')
const { verifyJwtToken } = require('../utils/jwt')

module.exports = {
  accessTokenValidator: async (req, res, next) => {
    try {
      let token = _getKeyValue(req.headers, 'authorization', null)

      if (!token) throw creatError.Unauthorized()
      token = token.split(' ')[1]
      req.payload = await verifyJwtToken({ token, secret: process.env.JWT_ACCESS_TOKEN_SECRET })
      next()
    } catch (error) {
      next(error)
    }
  }
}
Create routes
Now that we are done with all the required functionality we have to create routes for our users and for that, we have two files inside the routes directory namely
- auth.js: handles register/login routes
- user.js: protected routes that handle retrieving user’s data
Following is the code for the auth.js route file
const express = require('express')
const router = express.Router()

const { register, login } = require('../controllers/auth')

router.post('/register', register)
router.post('/login', login)

module.exports = router
and below one is our user.js route file.
As you can see our route /info is a protected one and that means it can only be accessed with a valid JWT token.
const express = require('express')
const router = express.Router()

const { getUser } = require('../controllers/user')
const { accessTokenValidator } = require('../middlewares/auth')
// accessToken validator middleware

router.get('/info', accessTokenValidator, getUser)

module.exports = router
Testing our JWT authentication in our nodejs app
Now we are all set with the coding section so, we are left only with the Testing part and for that, we will be using VS-code extension rest-client
Now the vs-code extension “rest-client” needs a “rest.http” file inside the root directory of our project containing all our requests.
So, inside the “rest.http” file we have.
POST http://localhost:3000/register
Content-Type: application/json

{
    "email": "[email protected]",
    "password": "Qwerty12!"
}

###login
POST http://localhost:3000/login
Content-Type: application/json

{
    "email": "[email protected]",
    "password": "Qwerty12!"
}

### get user data(protected route)
GET http://localhost:3000/user/info
Authorization: Bearer
Last but not least we start the server using
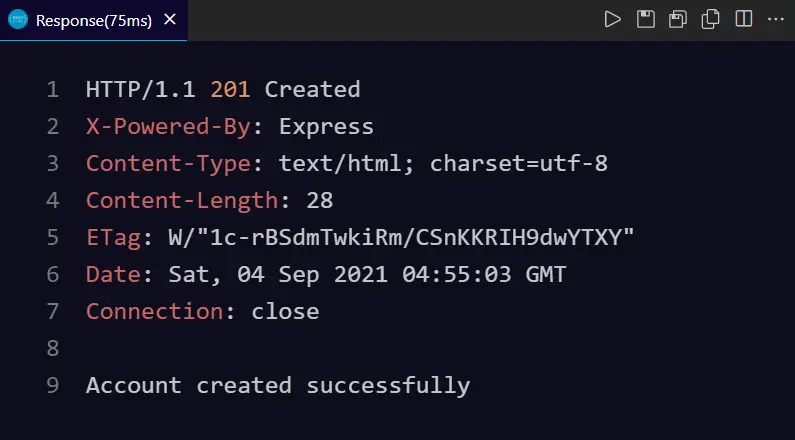
node app.jsLet’s start by registering a new user by requesting our register route. If our user was successfully created then our response will look something like this.
After we have a user let’s try login. in with the user details we just created. This will return us a JWT token which we can use later to request a JWT-protected route.
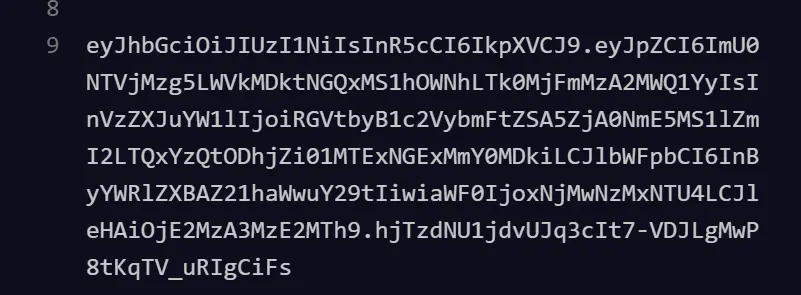
Note: currently we have set an expiry time of 1 minute so our token will only be valid for 1 minute. Please try changing it to something like 1hr in case you see an invalid token or something.
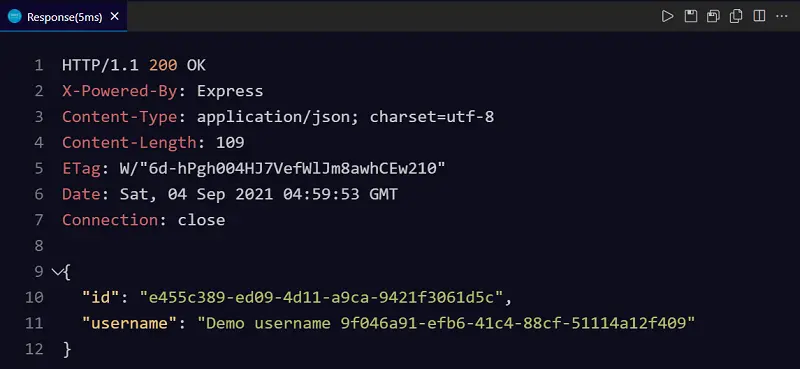
Now to use the token we need to pass our token in the header of our request.
Authorization: Bearer “Token_value”
For example:
Authorization: Bearer eyJhbGciOiJIUzI1NiIsInR5cCI6IkpXVCJ9.eyJpZCI6ImU0NTVjMzg5LWVkMDktNGQxMS1hOWNhLTk0MjFmMzA2MWQ1YyIsInVzZXJuYW1lIjoiRGVtbyB1c2VybmFtZSA5ZjA0NmE5MS1lZmI2LTQxYzQtODhjZi01MTExNGExMmY0MDkiLCJlbWFpbCI6InByYWRlZXBAZ21haWwuY29tIiwiaWF0IjoxNjMwNzMxNTU4LCJleHAiOjE2MzA3MzE2MTh9.hjTzdNU1jdvUJq3cIt7-VDJLgMwP8tKqTV_uRIgCiFsIf our token is valid we must have our user data returned as below
Improvements
Currently, our JWT token expires in 1 minute and once it expires a user will be technically logged out and needs to log in again to continue making requests. This is an issue as a client needs to log in repeatedly after a time interval. Fortunately, there is a solution to this problem using refresh tokens which we will cover in another tutorial.
Problems with JWT
- When a user logs out, he/she isn’t technically logged out until the token expires.
- It is very hard to revoke tokens.
- Between the time a token is issued and expires, data in the token has the possibility to become stale.
- JWT is not encrypted so data in it is visible. So it’s not advisable to store any sensitive data in the JWT token. Although this problem can be overcome by using JWE(JSON Web Encryption)
Conclusion
Walah! we have successfully learned how to add JWT authentication in a nodejs application. I hope, I managed to make you understand the basic idea behind the registration and login using JWT. If you people find it useful please don’t forget to appreciate it in the comment section.
If there is any doubt related to this post, please ask in the comment section. Also, don’t forget to share your feedback.
THANK YOU!


This was really helpfull to me to create my first JWT based node app. I just wanted to know why did you use lodash module in your code? what is the benefit of using that module?
Glad that this article was helpful. Lodash has been used just for convenience purposes.
the below code snippet
let token = _getKeyValue(req.headers, 'authorization', null)
can be replaced with the below one
let token = null
if (authorization' in req.headers) {
token = req.headers["authorization"]
}
but the former one is a bit cleaner than the latter. That’s why we choose to use lodash/get but it’s entirely optional.
Cheers