In this tutorial, we will be looking at how we can use docker-compose to deploy a nodejs MongoDB app. Now, for those who aren’t familiar with Docker, it is an open platform for developing, shipping, and running applications. In simple words, it enables us to separate our applications from our infrastructure so that we can deliver our software easily. So let’s start, shall we?
Create a node application
For this tutorial, we will be creating a nodejs application where we can upload audio files to a MongoDB database. Also, we can retrieve and play them to the client side.
Let’s initialize our project and install all the required dependencies.
npm init -ynpm install dotenv express gridfs-stream mongoose multer multer-gridfs-storageOnce we are done with the above part we create a simple express application and create a connection with MongoDB.
const express = require("express");
const path = require("path");
const mongoose = require("mongoose");
const multer = require("multer");
const { GridFsStorage } = require("multer-gridfs-storage");
const Grid = require("gridfs-stream");
const crypto = require("crypto");

// PORT declaration
const port = process.env.PORT || 3000;

// App initialization
const app = express();

// Middlewares
app.use(express.urlencoded({ extended: true }));

const CONNECTION_STRING = process.env.CONNECTION_STRING

// Create mongo connection
const connect = mongoose.createConnection(CONNECTION_STRING);
let gfs;
connect.once("open", () => {
  // Initialize stream
  gfs = Grid(connect.db, mongoose.mongo);
  gfs.collection("audio-uploads");
});

app.listen(port, () => console.log(`Server is up and running on PORT ${port}`));
Create storage object
For this particular tutorial, we are using the multer package for uploading files to our server. One thing I would like to remind you here is that we cannot save large files into MongoDB directly but rather will have to do in chunks and so, we have to use GridFS. Also, a problem is that Multer has no direct support for GridFs and so we also need some sort of an extension to help us with that which in this case would be the multer-gridfs-storage module.
How it will work is that we have to create an instance of GridFsStorage using the multer-gridfs extension which takes in a MongoDB connection URL and a file method. While the connection URL is self-explanatory, the file method returns a Promise which gets resolved into fileInfo object(file’s name and the collection where the file has to be uploaded) on success and gets rejected with an error message on failure.
Last but not the least, we also need to create a multer instance providing in the storage object we just created in addition to a filter method to filter out non-audio file formats.
const mongoose = require("mongoose");
const { GridFsStorage } = require("multer-gridfs-storage");
const crypto = require("crypto");

const mongoURI = `${CONNECTION_STRING}?authSource=admin`;
const storage = new GridFsStorage({
  url: mongoURI,
  file: (req, file) => {
    const { originalname } = file;
    return new Promise((resolve, reject) => {
      crypto.randomBytes(16, (err, buf) => {
        if (err) reject(err);
        const filename = buf.toString("hex") + path.extname(originalname);
        const fileInfo = {
          filename: filename,
          bucketName: "audio-uploads",
        };
        resolve(fileInfo);
      });
    });
  },
});
const upload = multer({
  fileFilter: (req, file, cb) => {
    const { mimetype } = file;
    if (mimetype !== "audio/mpeg" || mimetype !== "audio/ogg") {
      cb(null, false);
      cb(new Error("An error occured while uploading file!"));
    }
    cb(null, true);
  },
  storage,
});
Create ROUTES
Next is to set up our routes so that we can POST and GET our audio files. Here we have three routes.
POST: /upload – Here we will be implementing our audio upload logic to our database.
app.post("/upload", upload.single("file"), (req, res) => {
  if (err instanceof Multerror) {
    res.send("Something went wrong while uploading.");
  }
  res.redirect("/");
});
GET: /audios – Here we will be fetching all the audio details from the Database.
app.get("/audios", (req, res) => {
  gfs.files.find().toArray((err, files) => {
    if (!files || files.length === 0) {
      return res.send(404).json({
        err: "No files exists",
      });
    }
    return res.json(files);
  });
});
GET: /play/:filename – Here we will be passing an audio filename as a parameter in the URL to play it.
app.get("/play/:filename", (req, res) => {
  gfs.files.findOne({ filename: req.params.filename }, (err, file) => {
    if (!file || file.length === 0) {
      return res.send(404).json({
        err: "No file exists",
      });
    }
    const readstream = gfs.createReadStream(file.filename);
    readstream.pipe(res);
  });
});
After all the implementations, our application will look something like this.
const express = require("express");
const path = require("path");
const mongoose = require("mongoose");
const multer = require("multer");
const { GridFsStorage } = require("multer-gridfs-storage");
const Grid = require("gridfs-stream");
const crypto = require("crypto");

// PORT declaration
const port = process.env.PORT || 3000;

// App initialization
const app = express();

// Middlewares
app.use(express.urlencoded({ extended: true }));

const CONNECTION_STRING = process.env.CONNECTION_STRING

// Create mongo connection
const connect = mongoose.createConnection(CONNECTION_STRING);
let gfs;
connect.once("open", () => {
  // Initialize stream
  gfs = Grid(connect.db, mongoose.mongo);
  gfs.collection("audio-uploads");
});

// Create storage object
const storage = new GridFsStorage({
  url: CONNECTION_STRING,
  file: (req, file) => {
    const { originalname } = file;
    return new Promise((resolve, reject) => {
      crypto.randomBytes(16, (err, buf) => {
        if (err) reject(err);
        const filename = buf.toString("hex") + path.extname(originalname);
        const fileInfo = {
          filename: filename,
          bucketName: "audio-uploads",
        };
        resolve(fileInfo);
      });
    });
  },
});
const upload = multer({
  fileFilter: (req, file, cb) => {
    const { mimetype } = file;
    if (mimetype !== "audio/mpeg" || mimetype !== "audio/ogg") {
      cb(null, false);
      cb(new Error("An error occured while uploading file!"));
    }
    cb(null, true);
  },
  storage,
});

// Routes
app.get("/", (req, res) => {
  res.send(`<h1>Upload your file</h1>`);
});

app.post("/upload", upload.single("file"), (req, res) => {
  if (err instanceof Multerror) {
    res.send("Something went wrong while uploading.");
  }
  res.redirect("/");
});

app.get("/audios", (req, res) => {
  gfs.files.find().toArray((err, files) => {
    if (!files || files.length === 0) {
      return res.send(404).json({
        err: "No files exists",
      });
    }
    return res.json(files);
  });
});

app.get("/play/:filename", (req, res) => {
  gfs.files.findOne({ filename: req.params.filename }, (err, file) => {
    if (!file || file.length === 0) {
      return res.send(404).json({
        err: "No file exists",
      });
    }
    const readstream = gfs.createReadStream(file.filename);
    readstream.pipe(res);
  });
});

app.listen(port, () => console.log(`Server is up and running on PORT ${port}`));
Now that our application is ready we are only left with the task to use docker-compose and package our nodejs app.
Install Docker to our machine
Download docker from here and install it as a regular setup file.
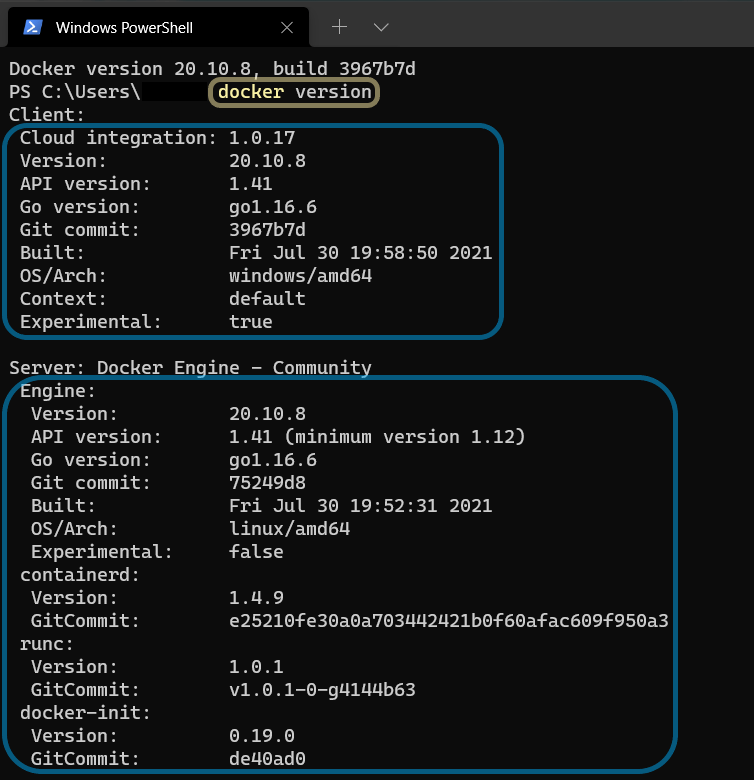
To check whether it is installed or not open a new terminal and type:
docker versionIt will show all the client and server details of your docker installation.
Create docker image
After successful installation of docker on our machine we are ready to create our docker image. For that, we need to simply create a file named Dockerfile in our project’s root directory.
In the Dockerfile we have to mention all the steps using some standard commands.
- FROM: Setting node:14 as the base image for our docker container.
- WORKDIR: Defining the working directory for our docker container, in this case it’s /Node-mongodb .
- COPY: Copy the package.json file from current directory on host machine to our working directory.
- RUN: Execute npm install to install all the dependencies.
- COPY: Copy everything from our local directory to our working directory.
- CMD: Run command node app.js to start the nodejs server.
FROM node:14

WORKDIR /Node-mongodb

COPY package.json .

RUN npm install

COPY . .

CMD ["node", "app.js"]
Create docker-compose file
Now that we have successfully created our docker image, let’s bring in all the pieces together in a neat docker-compose file and configure all of the services of our nodejs app.
We have two services namely mongodb and app.
Firstly we have configured our mongodb service as follows.
- image: we have used the official built-in mongo image as our base image for our mongodb service/container
- restart: we have set the restart as unless-stopped so that, it doesn’t get stopped and restart unless and until the container is stopped manually.
- environment: next we set the environment variables.
- ports: then we have expose a PORT for our mongodb service/container.
- volumes: at last we are mapping host volumes to container volumes.
  mongodb:
    image: mongo:5.0.2
    restart: unless-stopped
    environment:
      - MONGO_INITDB_ROOT_USERNAME=root
      - MONGO_INITDB_ROOT_PASSWORD=123456
    ports:
      - 27017
    volumes:
      - db:/data/db
Secondly, we need to configure our app service.
- depends_on: this ensures that mongodb service is running before the app service starts so that our app services doesn’t crash when it tries to connect to an unavaible mongodb connection.
- build . : “build .” tries to create docker image with Dockerfile from the current directory.
- restart: we set this to unless-stopped to also make use that our app services restarts on failure until and unless the container is stopped explicitly.
- ports: mapped host port to container port.
- environment: setting up environment variables.
- CONNECTION_STRING: stores the URL of our MongoDB .
- stdin_open: open the docker in interactive mode.
- tty: It provides a virtual terminal session.
app:
    depends_on:
      - monogdb
    build: .
    restart: unless-stopped
    ports:
      - "8080:80"
    environment:
      - CONNECTION_STRING=mongodb://mongodb/audios
    stdin_open: true
    tty: true
In the end, our Docker-compose file looks something like below
version: '3'
services:
  mongodb:
    image: mongo:5.0.2
    restart: unless-stopped
    environment:
      MONGO_INITDB_ROOT_USERNAME: root
      MONGO_INITDB_ROOT_PASSWORD: 123456
    ports:
      - "27017"
    volumes:
      - db:/data/db
  app:
    depends_on:
      - monogdb
    build: .
    restart: unless-stopped
    ports:
      - "8080:8080"
    environment:
      - MONGO_DB_URI=mongodb://mongodb/audios
    stdin_open: true
    tty: true
volumes:
  db:
    external: true
Now there is a small problem though which we haven’t discussed yet is that in case we want to stop our containers using docker-compose down all our uploaded data would perish. To make sure data persistence we need to explicitly create an external docker volume(db) and use that in the volume mapping section of our mongodb service.
Notice the volumes at the end of the docker-compose file? that is what is there for. At last, run a command to the terminal to start our docker web application.
docker-compose up -dTest our application
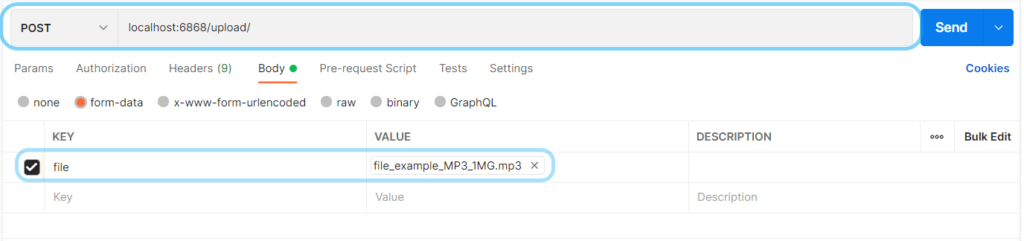
After the successful deployment of our application let’s test our application. We will be using POSTMAN to test it.
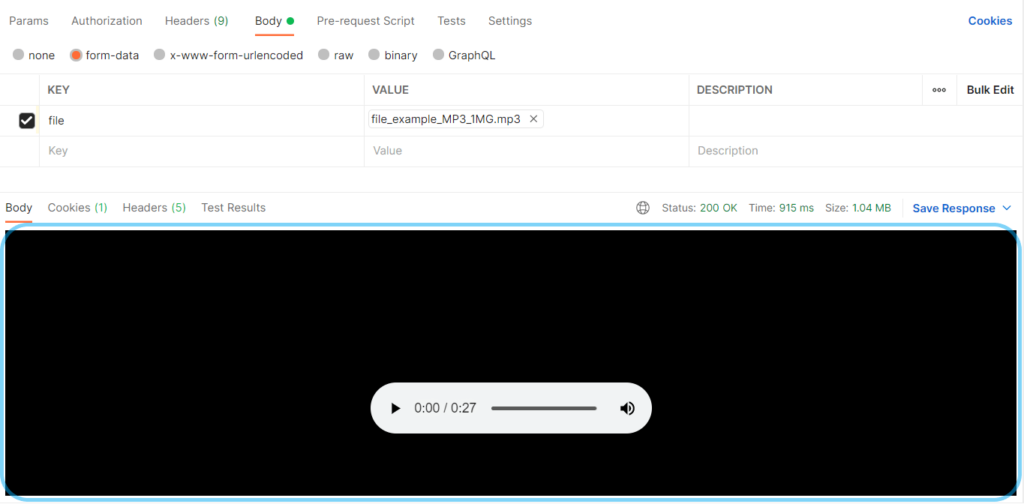
Firstly, POST a file to the /upload endpoint with form-data as the body.
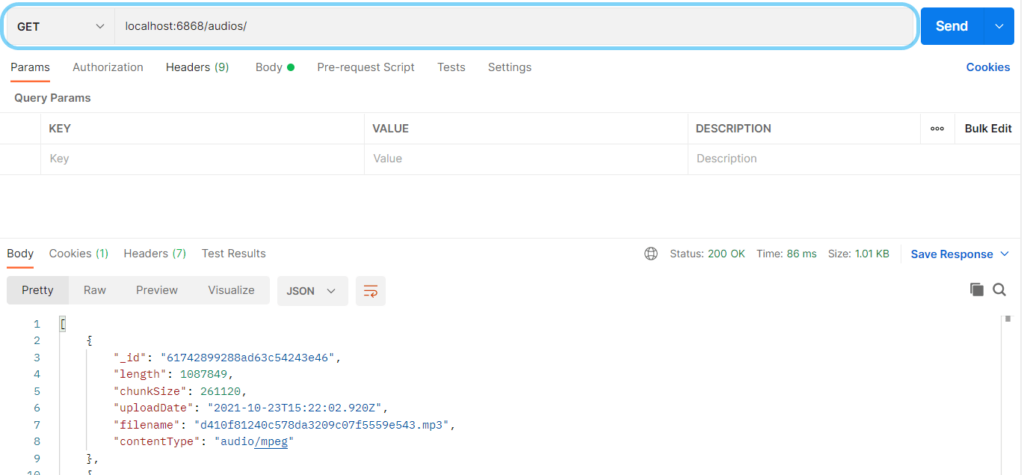
After that, we can get all the uploaded audio files information at /audios.
We can also play an audio file providing fileName as a parameter to URL /play/:fileName.
Conclusion
Walah! we have successfully deployed our node application using docker-compose. I hope you people have enjoyed learning it. If you find it useful please feel free to appreciate it in the comments. Also, don’t forget to raise your queries in the comment section.
THANK YOU!