The demand for web3 developers is growing day by day and has become a very lucrative career for a developer. In this tutorial, we will learn how we can very easily get started with web3 development as a frontend developer using an in-depth example using metamask. So let’s get started.
Intro to web3
Web3 short for Web version 3 is a decentralised peer to peer version of the current internet. Web3 is still in its early stage improving and growing day by day as we speak the main tech behind web3 which is blockchains are getting better over time.
How is it different from web2?
Unlike web2 where everything is centralized and controlled by a centralized entity, web3 is a peer to peer network of nodes and gives control back to its users. Also in web2, the controlling entity owns your data, can use it in whatever way they like and can censor it as per their liking. On the other hand, in web3 a user has full control over his/her data and is censor free.
Web3 also has an added advantage over web2 in that payments are built–in/native and for the first time allow users to directly transfer value over a network using its native tokens.
There are some drawbacks in web3 if we compared that to web2 but we will not discuss those in this tutorial.
Basis requirements for web3 development
- Web3.js – a popular library that will enable our frontend app to talk to the blockchain.
- Metamask – a popular web3 wallet.
- http server – to serve our frontend app. We here in this example used.
Basic frontend web3 app using metamask
What will we be building today?
We will be developing a simple frontend app that will connect with our metamask wallet and display its balance. We will also need to make our app aware of network changes or account switching by a user and still be able to display the balance properly.
Setup our project
Before we start discussing our code’s logic we need to set up our file structure. Our file setup is very simple and only consists of 2 files.
- index.html – contains our app layout and some styles.
- app.js – contains all the logic for our app.
index.html
<html>
    <style>
        html, body {
            height: 100%;
            background: rgb(252, 250, 250);
        }
        .container {
            margin: 1rem;
            display: flex;
            flex-direction: column;
            height: 100%;
        }

        .balbox {
            display: flex;
        }
        nav {
            display: flex;
            justify-content: flex-end;
        }
        nav > * {
            margin: auto 1rem;
        }
        button {
            border: 1px solid rgb(0, 119, 255);
            background-color: rgb(0, 119, 255);
            color: white;
            padding: 5px 20px;
            font-size: 24px;
            cursor: pointer;
            border-radius: 5px;
        }
        button:hover {
            background-color: rgb(52, 146, 253);
        }
        #addr {
            border: 2px solid #20d99a;
            border-radius: 10px;
            padding: 10px;
            text-overflow: ellipsis;
            width: 100px;
            overflow: hidden;
        }
    </style>
    <body>
        <div class="container">
            <nav>
                <span id="addr"></span>
                <button id="connect">Connect</button>
            </nav>
            <div class="balbox">
                <h2>Balance:</h2>
                <h2 id="displaybal"></h2>
            </div>
        </div>
    </body>
    <script src="https://cdn.jsdelivr.net/npm/[email protected]/dist/web3.min.js"></script>
    <script src="app.js"></script>
</html>
Inside our body, we have
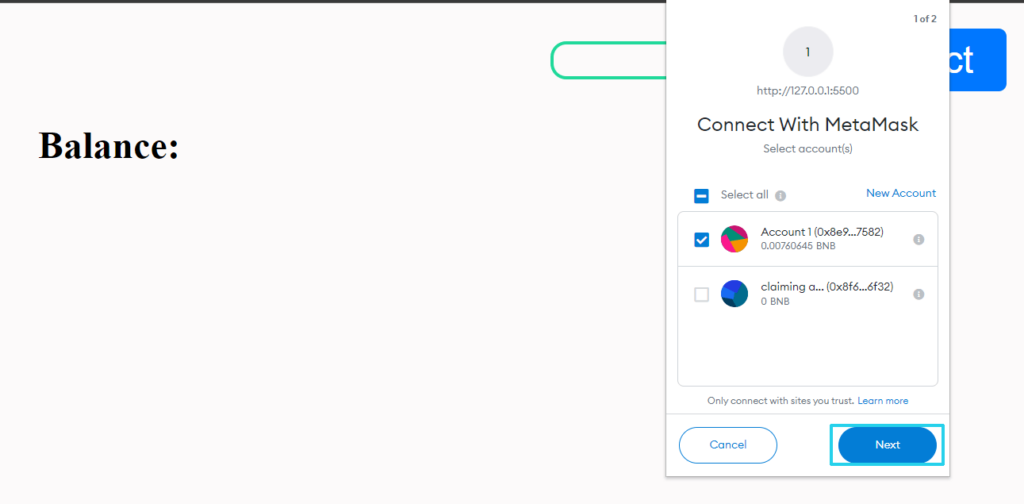
- span(#addr) – which will display the user’s current active address
- button(#connect) – which will connect our app to connect to metamask.
- h2(#displaybal) – will display our wallet balance
below our body, we have included 2 scripts
- web3.js – which allows our app to interact with EVM based blockchains.
- app.js – handles all our app’s core logic.
Prepare our app.js for web3 development
Inside our app.js we will have the below structure
const initialize = () => {
  //We have selected our required html elements
  const connectButton = document.getElementById('connect');
  const addr = document.getElementById("addr");
  const displayBal = document.getElementById("displaybal");

  const logout = () => {
    // code for handling logout
  }

  const connectHandler = (ev) => {
    // we automatically try to populate address and balance if metamask is connected.
  }

  const accountsChangedHandler = (accounts) => {
    // code for handling metamask account swithing by user
  }

  const chainChangedHandler = (chainId) => {
    // code for handling network swithing by user. eg user may switch from ethereum to binance smart chain
  }

  const clearListeners = () => {
    // clears all ethereum listeners provided by metamask
  }

  const getBalance = async (account) => {
    // code to fetch user's balance for currently active address
  }

  const onClickConnect = async () => {
    // code for triggering connection to metamask and fetching all user accounts
  };

  const isMetaMaskInstalled = () => {
     //code to check if the MetaMask extension is installed
  };

  const metaMaskClientCheck = () => {
    // creating our web3 instance and setting up listeners for various metamask events if metamask is installed
  };
  metaMaskClientCheck();
};

// this ensure that intialize is called after our dom content has been loaded.
window.addEventListener('DOMContentLoaded', initialize);
isMetaMaskInstalled
We have to check for the installation of the ethereum binding on the window object. ethereum.isMetaMask differentiates MetaMask from other ethereum-compatible browsers.
const isMetaMaskInstalled = () => {
    const { ethereum } = window;
    return Boolean(ethereum && ethereum.isMetaMask);
};
metaMaskClientCheck
The main part to concentrate on here is the condition when metamask is installed. If we are successful in detecting metamask we create our web3 instance using window.ethereum as our provider.
You may wonder what a provider is? To put it simply, a web3 Provider is an abstraction of a connection to the Ethereum network. Web3.js uses it to send JSON RPC requests and get a corresponding response.
const metaMaskClientCheck = () => {
    //Now we check to see if MetaMask is installed
    if (!isMetaMaskInstalled()) {
      //The button is now disabled
      connectButton.disabled = true;
      alert("Metamask not installed");
    } else {

      // attach click handler
      connectButton.onclick = onClickConnect;

      //If it is installed we change our button text
      connectButton.disabled = false;

      // instantiate web3, here we are using window.ethereum injected by metamask as our provider.
      window.web3 = new Web3(window.ethereum);


      // listening to events
      ethereum.on('connect', connectHandler);
      ethereum.on('accountsChanged', accountsChangedHandler);
      ethereum.on('chainChanged', chainChangedHandler);
    }
};
Next, we have also set up our event listeners.
- connect – metamask provider emits this event when it first becomes able to submit RPC requests to a chain.
- accountsChanged – metamask provider emits this event whenever the user switches between accounts.
- chainChanged – metamask provider emits this event whenever the user switches between networks.
onClickConnect
Clicking the connect button triggers this function. Now one thing to note here is that we are using the connect button both to connect and disconnect and therefore we will need to update the button text as such.
If button text is “connect” it means we are not connected and therefore request a connection to metamask using “eth_requestAccounts” and also request user accounts using “eth_accounts” if our request connection is successful.
After that, we pass on the accounts to accountsChangedHandler as an argument. In case we are already connected, clicking on the connect button will trigger our logout function.
const onClickConnect = async () => {
    try {

        if (connectButton.innerText == "Connect") {
          connectButton.disabled = true;

          // Will open the MetaMask UI
          await ethereum.request({ method: 'eth_requestAccounts' });
          connectButton.disabled = false;

          //fetch user accounts.
          const accounts = await ethereum.request({ method: 'eth_accounts' });
          connectButton.innerText = "Disconnect";

          //We take the first address in the array of addresses and display it
          accountsChangedHandler(accounts);
        } else {
          logout();
        }
    } catch (error) {
        console.error(error);
    }
};
accountsChangedHandler
This function takes in an accounts array as an argument and if the accounts array is non-empty it updates the UI to reflect the current address and also calls the getBalance function with the current account. In the case of an empty accounts array, we call the logout function.
const accountsChangedHandler = (accounts) => {
    if (accounts.length) {
      addr.innerText = accounts[0];
      getBalance(accounts[0]);
    } else {
      logout();
    }
}
getBalance
Fetches the user’s currently selected wallet’s balance and updates it in the UI.
const getBalance = async (account) => {
    const bal = await web3.eth.getBalance(account);


    // alternative way without using web3
    // const balInHex = await ethereum.request({ method: 'eth_getBalance', params: [account] });
    // const bal = web3.utils.hexToNumberString(balInHex)
    displayBal.innerText = web3.utils.fromWei(bal, "ether");
    addr.style.display = "";
}
chainChangedHandler
This gets triggered whenever a user switches between networks. Here we remove all our listeners by calling clearListeners before reloading our page.
const chainChangedHandler = (chainId) => {
    clearListeners();
    window.location.reload();
}
logout
const logout = () => {
    addr.innerText = "";
    displayBal.innerText = "";
    addr.style.display = "None";
    connectButton.innerText = "Connect";
}
clearListeners
Clears all our listeners.
const clearListeners = () => {
ethereum.removeListener('connect', connectHandler);
ethereum.removeListener('accountsChanged', accountsChangedHandler);
ethereum.removeListener('chainChanged', chainChangedHandler);
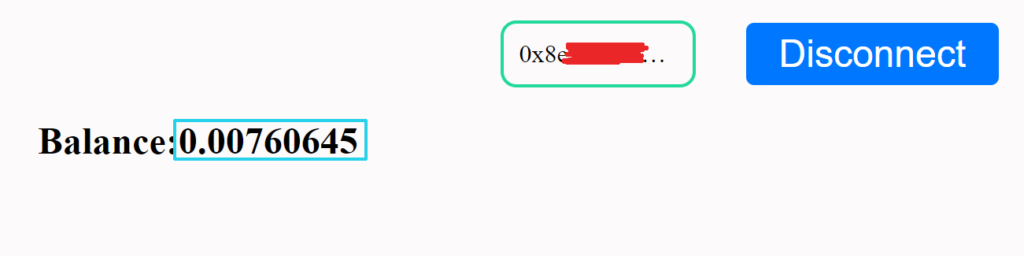
}Result
Conclusion
Walah! we have created our very first frontend web3 app. Hope you find it useful. If you liked this blog feel free to appreciate it in the comments. Also if there is any query don’t forget to ask in the comment section below.
THANK YOU!